Baby cry detection demo
- Renesas RA6E1
- Renesas RA8P1
Introduction - VK-RA6E1
This tutorial provides a complete walkthrough for developing and testing a Baby Cry Detection model using Renesas’s VK-RA6E1 Voice User Interface Kit and Reality AI Tools (Explorer Tier). Reality AI Tools enables AI model generation for non-visual sensing applications.
By the end of this tutorial, you will:
- Set up the development environment.
- Collect and upload labeled audio data.
- Build and train an AI model.
- Deploy and test the model on the VK-RA6E1 hardware.
Follow the sections sequentially for best results.
Overview of the sections
| Section | Description |
|---|---|
| 1 | Setting Up the Environment |
| 2 | Data Collection |
| 3 | Model Generation |
| 4 | Deploying & testing |
Section 1: Setting Up the Environment
This section covers the prerequisites for running the Baby Cry detection demo.
To complete this tutorial, ensure that you have the following:
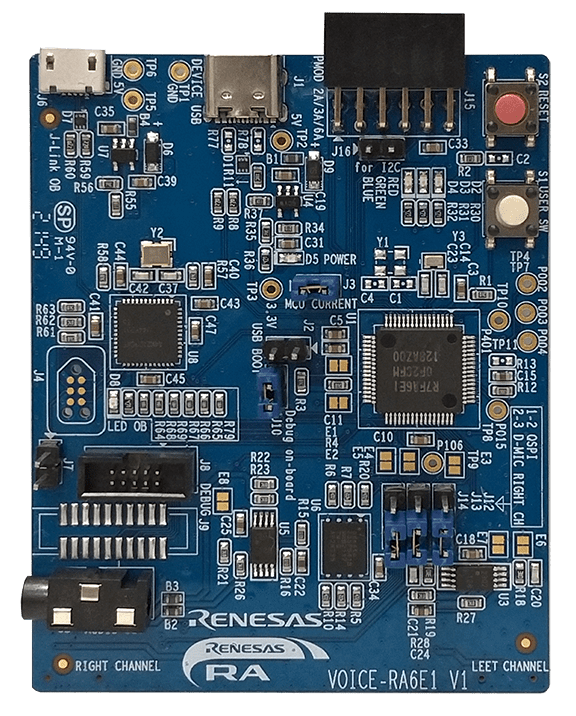
- VK-RA6E1 Voice User Interface Kit, which includes:
- RA6E1 board
- Necessary USB cables
-
Renesas e² Studio IDE, version 2024-07 or newer, with Flexible Software Package (FSP) 5.6.
-
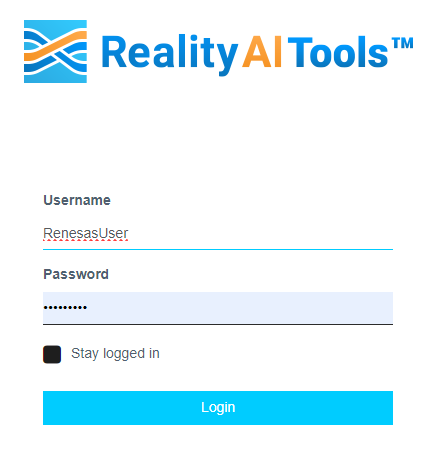
Reality AI Tools account access:
- Log in to Reality AI Tools using the provided username and password.
- If you need credentials for the Reality AI portal or access to the pre-configured e² Studio project, contact the Renesas AI COE Customer Success team at rai-cs@dm.renesas.com.
Keep the Reality AI Tools portal open in the background during the lab.
Section 2: Data Collection
This section describes how to collect data using the Reality AI Eclipse plugin integrated into e² Studio.
Setting Up the Workspace, Project, and Data Connection
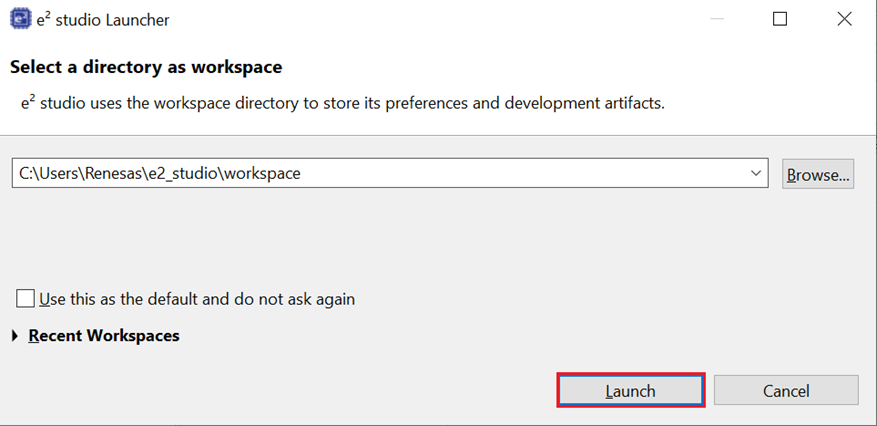
- Open e² Studio Launcher and click Browse to select a workspace.
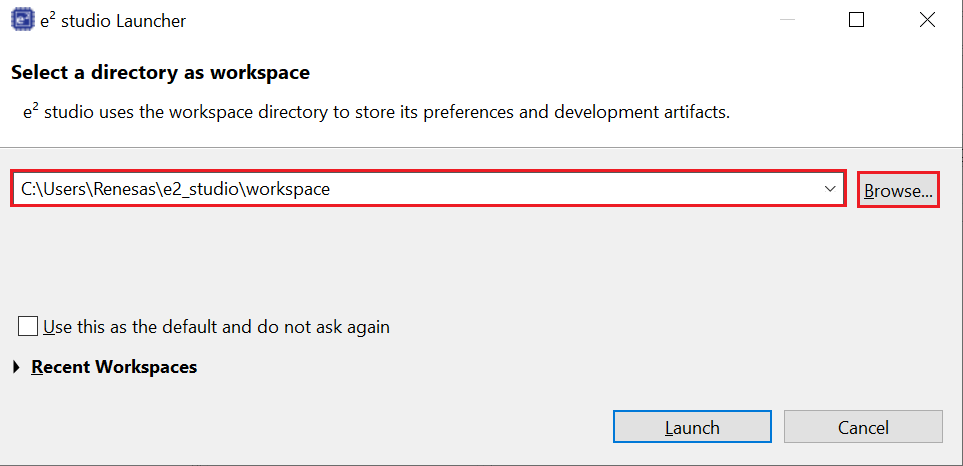
- Click Launch.
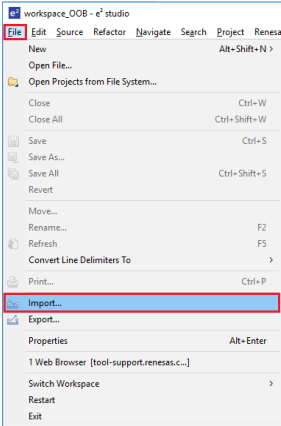
- Navigate to File > Import.
- In the Import window, under General folder, select Existing Projects into Workspace.
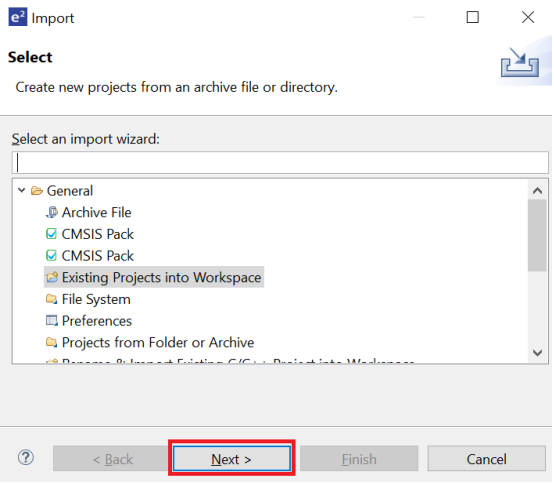
- Click Next to continue.
- Select Select root directory, then click Browse to locate the example project folder.
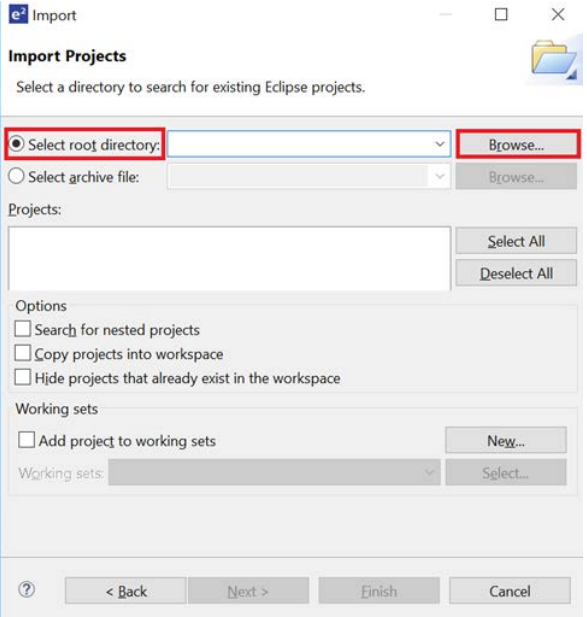
- Complete the project import into the workspace.
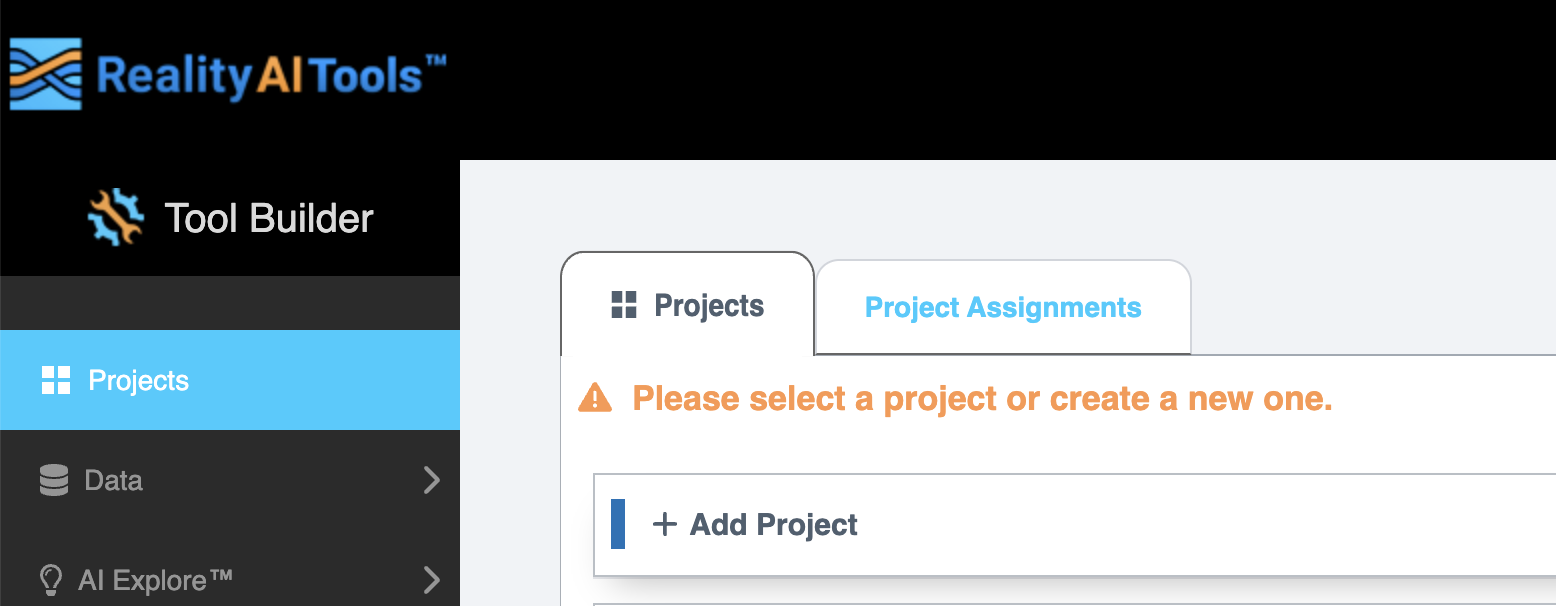
Creating and Setting Up the Project in Reality AI Tools
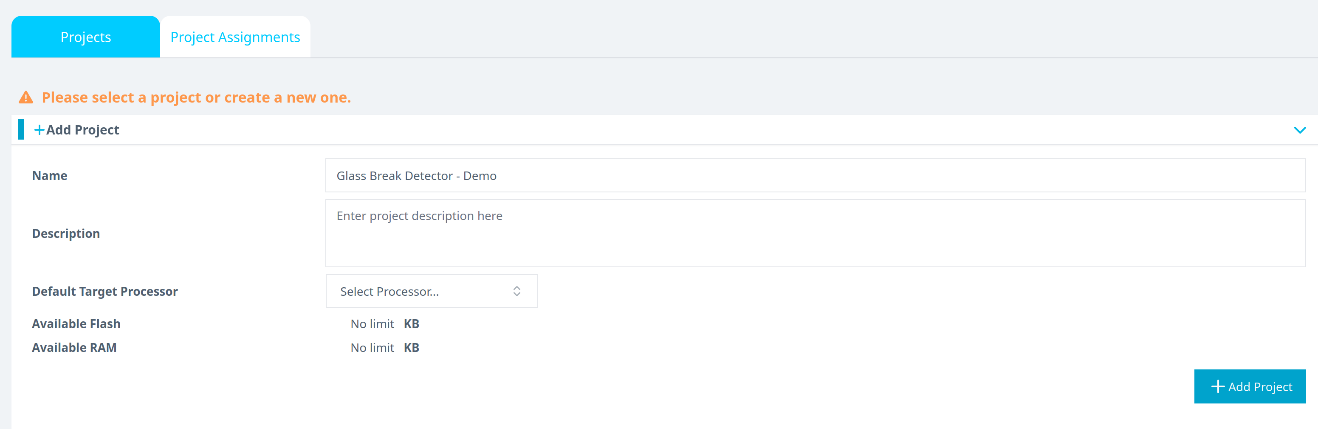
- In the Reality AI Tools portal, create a new project:
- Click +Add Project.
- Enter a project name and, optionally, a description.
- Click the +Add Project button in the lower-right corner.
If you are using an Explorer Tier subscription, you can skip creating a new project and use the existing Baby Cry Detection project to upload and analyze data.
Connecting e² Studio to Reality AI Tools
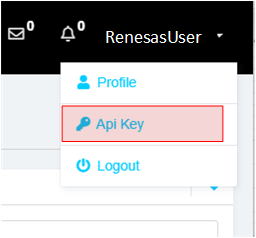
- In the Reality AI portal, click your username in the top-right corner and select API Key.
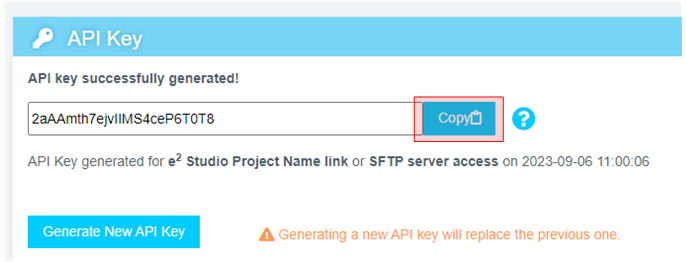
- Copy the displayed API key to the clipboard. This key is required to connect e² Studio IDE to Reality AI Tools.
- Return to e² Studio IDE and navigate to Renesas AI > Reality AI Authentication.
(If the Renesas AI menu does not appear, refer to the appendix for troubleshooting.)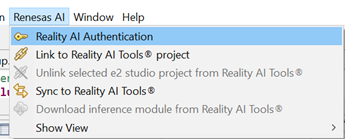
- Click Add to add a new API key and connect the account to your workspace.
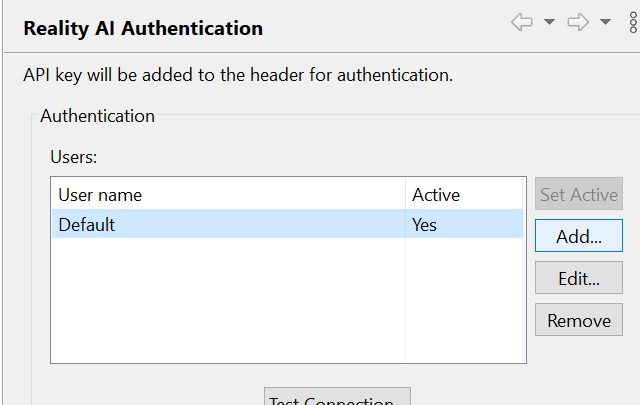
- Paste the API key, then click Apply and Close.
 The IDE is now connected to Reality AI Tools.
Configuring the Data Storage Tool and Device Communication
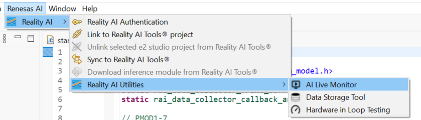
- Navigate to Renesas AI > Reality AI > Reality AI Utilities > Reality AI Data Storage Tool.
A new window will open in the bottom pane. - Click and drag the Reality AI Data Storage Tool view to the main view area.
- In the dropdown list, select the imported project.
- Click the Data Connection button.

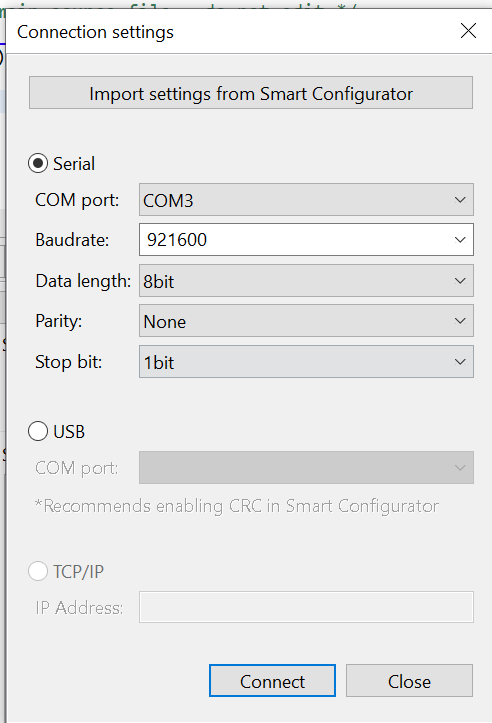
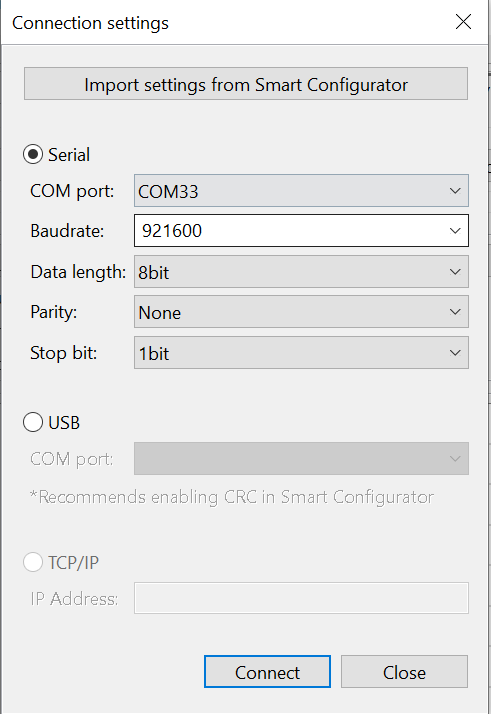
- In the connection menu:
- Select the correct COM port.
- Set the baud rate to 921600.
- Confirm communication parameters as 8-N-1.
- Click Connect, then Close.
- Verify that the status in the top-left shows Receiving data... with a green check mark.
(The green check mark indicates successful connection, not active data reception.)
Building and Running the Project
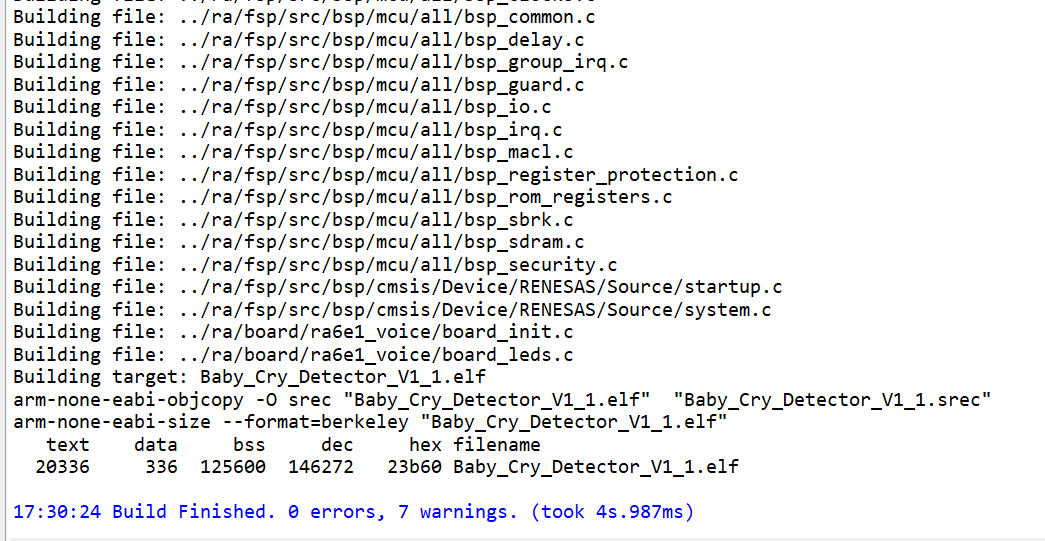
- Build the project by clicking the Hammer icon.

- Ensure the project builds without errors.
- Start a debug session by clicking the Debug icon in the toolbar.

- If prompted by Windows Defender, click Allow access.
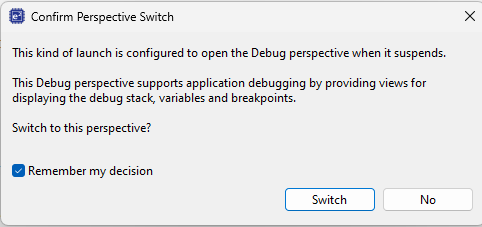
- If a dialog box appears asking to switch perspectives, check Remember my decision and click Switch.
- Click the Resume button twice. The program will begin running.

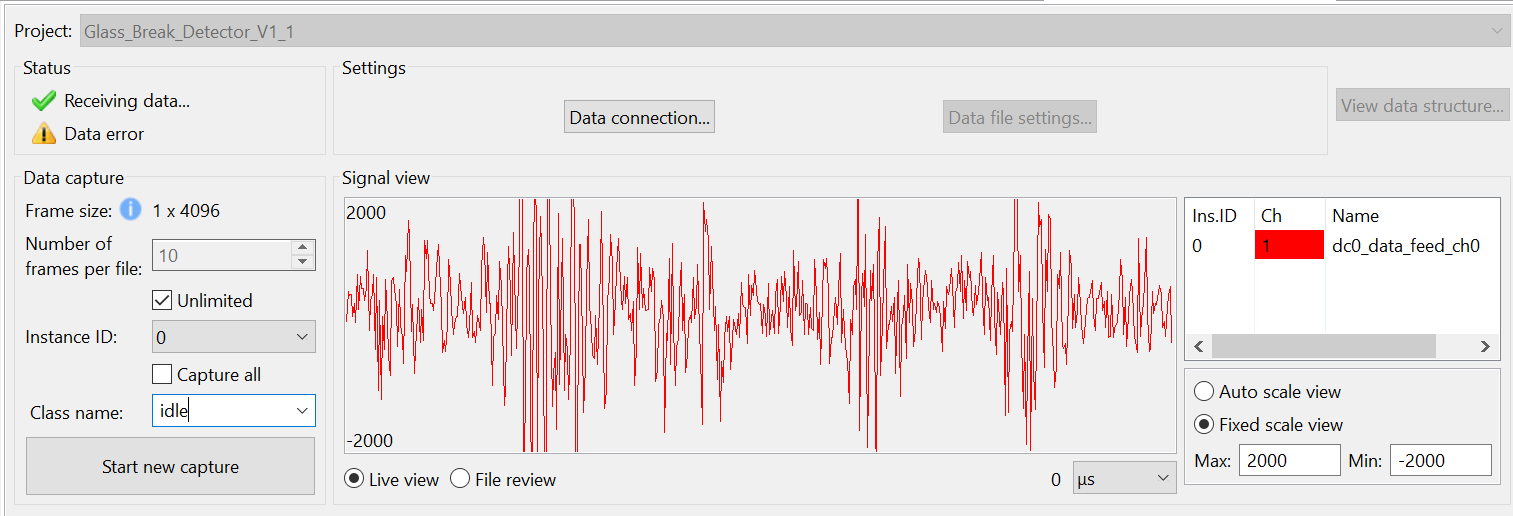
Verifying Device Data Capture
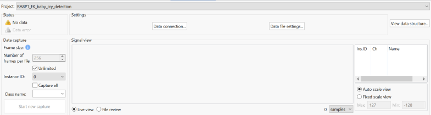
- Open the Reality AI Data Storage Tool view and check for waveform activity in the Signal view.
- If no waveform is visible, switch to File Review and then back to Live View (highlighted below).
- If the waveform is still absent, recheck the prerequisite steps to make sure the connections are correct.
Capturing Data
- In the Reality AI Data Storage Tool:
- Enter a name in the Class Name text box.
- Enable the Unlimited checkbox to allow variable-length data capture.
There are two methods to collect data:
- Number of frames per file: Stops data collection after reaching the specified number of frames.
- Unlimited: Data collection continues until manually stopped.
For this project, use the Unlimited setting. Setting Number of frames per file to 200 typically captures about 52 seconds of audio. However, this tutorial assumes Unlimited capture.
-
To record Baby Cry audio:
- Set Class Name to
baby_cry. - Play the sample Baby Cry audio files using a phone or PC speaker while recording. (Sample dataset)
- Set Class Name to
-
To record background/environmental sounds:
- Set Class Name to
everything_else. - Record ambient audio such as quiet room noise, typing, or speaking for 2–3 minutes. The goal is to capture a representative sample of the surrounding environment.
- Set Class Name to
-
To complete data capture, click the Red Square (Terminate Debug Session) icon.
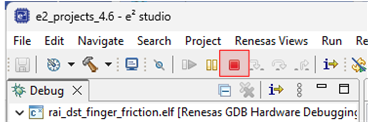
If the terminate icon is not visible, switch to the Debug perspective in the upper right corner in e² Studio.
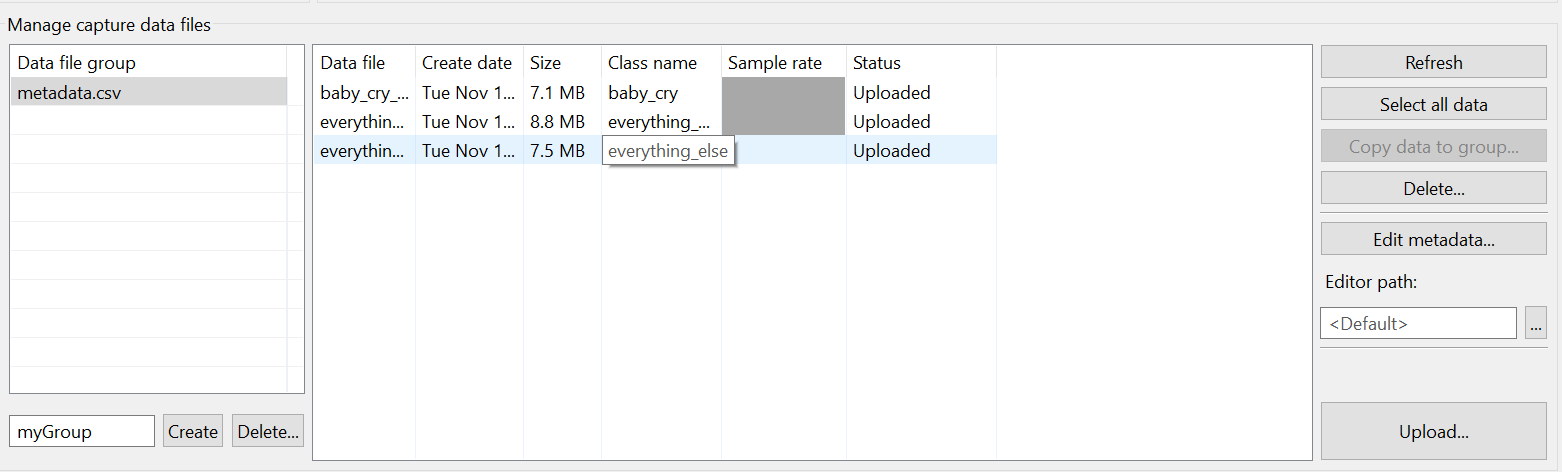
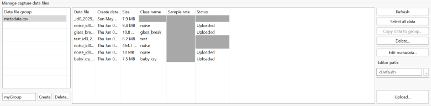
Uploading Captured Data
The collected data will be displayed in the list of metadata/file description. You can upload this data to Reality AI Tools using Upload and run analysis on it.
Follow these steps to upload the collected data to Reality AI Tools:
-
In the Manage capture data files section, select the recorded data files (use Ctrl+Click to multi-select).
-
Scroll down to reveal the Upload button.
-
Click Upload.
-
In the upload dialog:
- Select the project created earlier (e.g., Baby Cry Demo) on the Reality AI website.
- Set the sampling rate to 4096 Hz.
-
Click OK.
-
Wait for a confirmation message indicating successful upload.
The metadata and the data files will now appear in Reality AI Tools.
Section 3: Model Generation
This section describes how to create AI models using the collected dataset. A Reality AI Tools Explorer Tier account is required.
If you need credentials or portal access, contact the Renesas AI COE Customer Success team at rai-cs@dm.renesas.com.
Preparing the Dataset for Formatting
-
If not already logged in, access Reality AI Tools at https://portal.reality.ai/login using your provided credentials.
-
In the Reality AI Tools portal, set the Baby Cry Demo project as active.

-
Click the Data tab on the left panel to expand the view.
-
Click Curate.
-
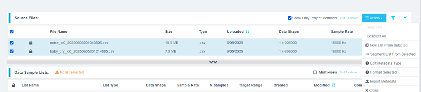
Expand Source Files.
-
Select all files by checking the box next to File Name.
-
Click the Action button, then select Format Selected.

Formatting the Data
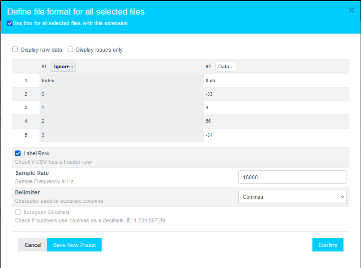
When the formatting dialog opens, perform the following steps:
- Click Data to expand the dropdown list.
- Use the scrollbar (or mouse wheel) to navigate through the list.
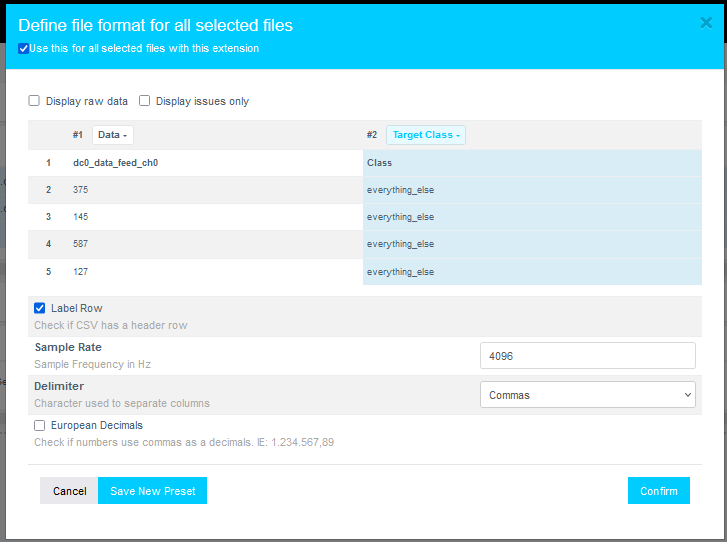
- Set the second class as the Target Class.
- Assign the Sample Rate to 4096 Hz.
- Click Confirm.
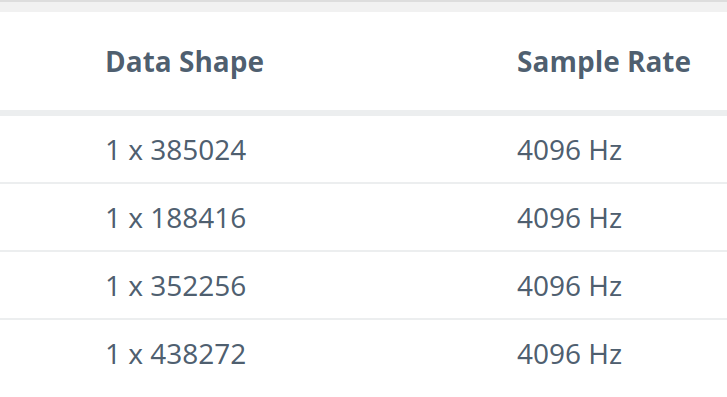
Verify that:
- The data shape now displays as 1 × (number of samples).
- The sample rate is 4096 Hz.
Preprocessing and Segmenting the Data
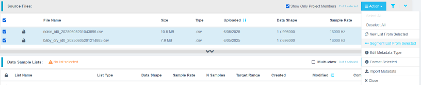
- Click the Action button again and select Segment List from Selected.

Why Segmentation?
Segmenting the data prepares it for deployment on Renesas MCUs, which require models to process short windows of live data. These models must process live data within a resource constrained environment. Instead of feeding several seconds or minutes of continuous audio, the model analyzes brief windows (e.g., 1 second or 500 milliseconds or even smaller) to make quick predictions. To mimic that effect, we break down the raw training data and feed that to the model generation engine to start learning what it is going to see in a live (production) setting.
- In the Segment Files dialog, perform the following actions:
- Set Window Length to 4096 samples.
- Click the 50% button to set a 50% Offset (overlap).
- Provide a meaningful name for the Output Sample List.
- Click Submit.
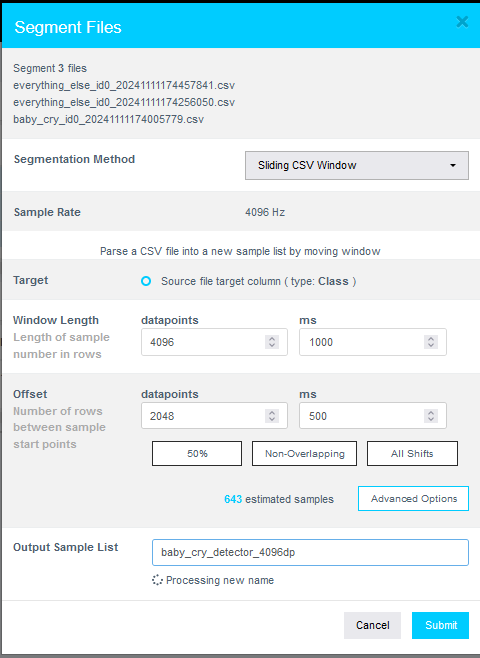
The number of estimated samples depends on the amount of data collected. It is acceptable if your sample count does not exactly match the example shown.
Definitions:
- Window Length: Defines how much data the AI model considers for making a classification decision.
- Offset: Defines how far ahead the next window starts after the previous one.
- A 50% overlap provides a good balance between variation coverage and redundancy.
- Use non-overlapping windows if you have a large dataset with longer offsets. Typically, users will do initial exploration and training on a subset of the available data.
- Use "All Shifts" (offset = 1) when testing a finalized model or a suitable candidate classifier to simulate performance on a stream of new data arbitrarily sampled.
- After successfully creating the segmented list, navigate to AI Explore > Classes.

Reality AI Tools offers three types of AI model training:
- Classes: For labeled categorical data (used in this tutorial).You might have noticed that we uploaded perfectly labeled data in section 1. Labeled datasets are required for supervised learning.
- Values: For regression tasks predicting numeric values (e.g., temperature, tire pressure) of int and float type. This is also supervised learning.
- Anomalies: For anomaly detection models, using only examples of normal data to build a baseline. It is a semi-supervised model.
Exploring and Training the Model
- Select the newly created segmented list.
- Click Start Exploring to begin feature discovery and model training.
What happens during exploration?
- Clicking Start Exploring initiates automatic model generation by Reality AI Tools.
- It will create several optimized feature sets and machine learning models that best fit the classification problem and then summarize each model’s accuracy and resource consumption.
- The system:
- Creates a balanced subset of the uploaded samples (equal examples per class)
- May perform sub-sampling for a shorter processing time if the dataset is exceptionally large.
- Discovers the best feature sets and machine learning parameters for separating the different training classes represented in the data.
- Builds multiple machine learning models using feature sets that are most promising, which are trained on the sub-sample.
- Performs K-Fold Validation (K=10) to evaluate models.
- Displays only the best-performing results.
- Typically, several hundred feature sets and models are evaluated during a single AI Explore run.
What is K-Fold Validation?
- K-Fold Validation splits the dataset into K sections (folds).
- Each fold is used once as a testing set, while the remaining folds are used for training.
- Example: In 10-Fold validation (K=10), the data set is split into 10 folds. In the first iteration, the first fold is used to test the model, and the rest are used to train the model. In the second iteration, the 2nd fold is used as the testing set while the rest serves as the training set. This process is repeated until each fold of the 10 folds has been used as the testing set.
- Reality AI Tools uses K=10 by default on the AI Explore page.
Selecting and Saving the Best Model
- After exploration completes, review the generated models.
- Select the highest-performing model.
(Recommended: Choose a model with the Spectral Magnitude feature space.) - Click Create Base Tool.
- Hover over each Explanation to understand key details about each model.
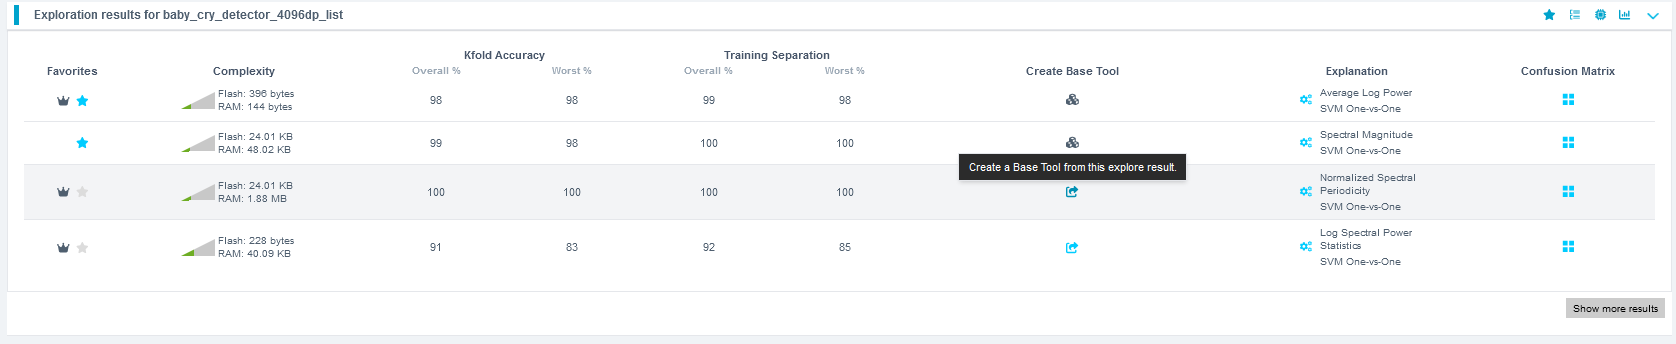
- Provide a name for the Base Tool, or accept the suggested name.
- Click Add.
 The icon will update to indicate that the Base Tool has been created.

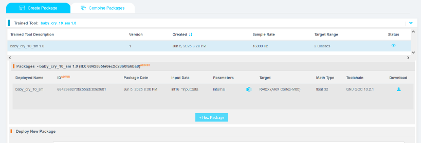
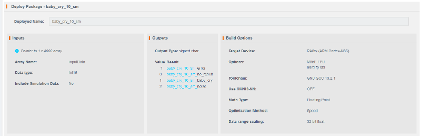
Packaging the Model for Deployment
Now the model is ready to be deployed. Follow these steps to produce a new package.
- Navigate to Deploy > Embedded.
- In the Trained Tool Description list, select the Base Tool created earlier.
- Click + New Package.

- Configure the package settings as needed.
- It is recommended to use the deployed name
baby_cry_lsp_v2to match the references in the e² Studio project. - If you use a different name, you must update references in the project code accordingly.
- It is recommended to use the deployed name
- Click Submit to generate the deployment package.
It may take approximately 10 to 15 minutes for the package to be ready for download.
- Once available, download the generated .zip archive.
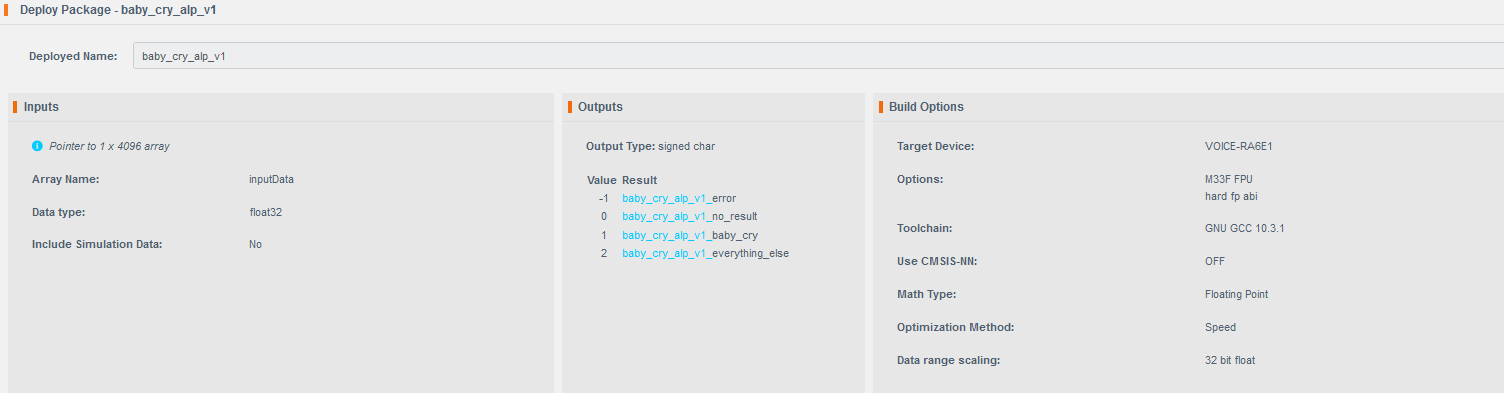
- Extract the archive. It should contain nine files.
- Copy and paste all extracted files into the following project's src directory in e² Studio project workspace:
src > realityai
Overwrite the existing files when prompted.
File names may vary depending on the project name assigned in Reality AI Tools.
In the updated files, the model function call is referenced in the header file baby_cry_lsp_v2_model.h.

Section 4: Deploying & testing the model
This section explains how to deploy the trained model to the hardware and validate its performance.
Updating the Project Code
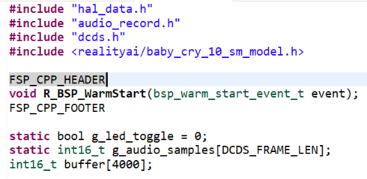
- Open the
hal_entry.cfile in e² Studio. - Verify the model header file:
- If the deployed model name is
baby_cry_lsp_v2, no changes are required.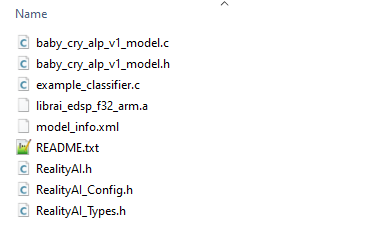
- If a different name was used, update line 37 to reference the correct model header file.
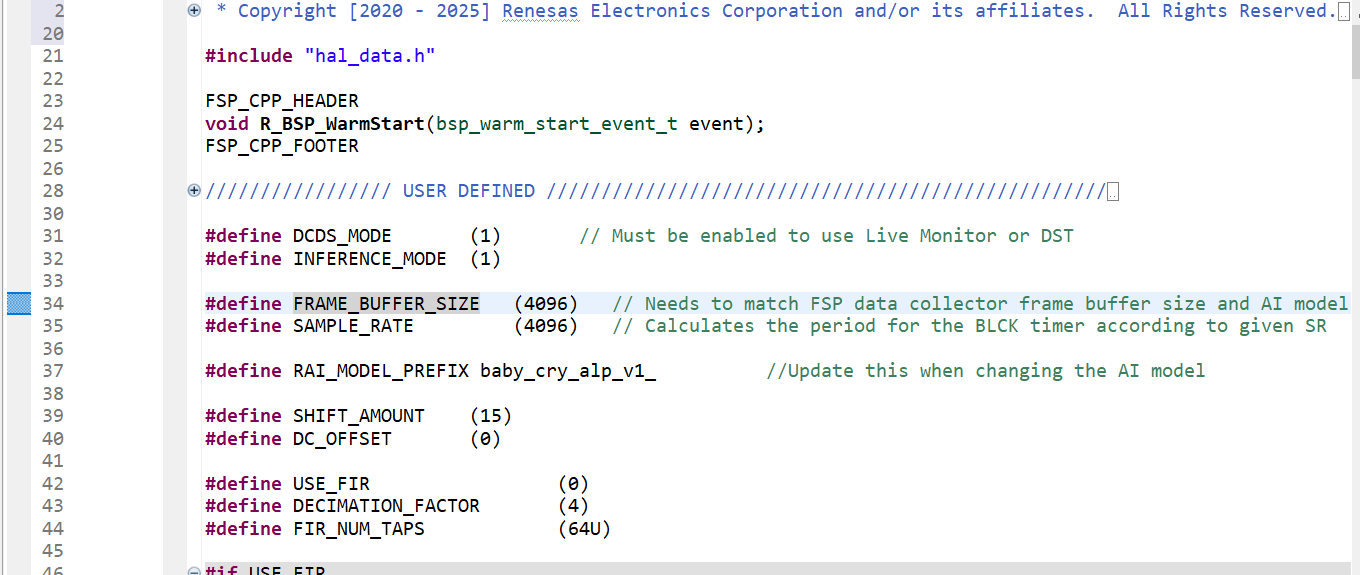
- If the deployed model name is
- Update the class name:
- Locate line 286.
- Replace
baby_crywith the class name you assigned for the Baby Cry event during data capture.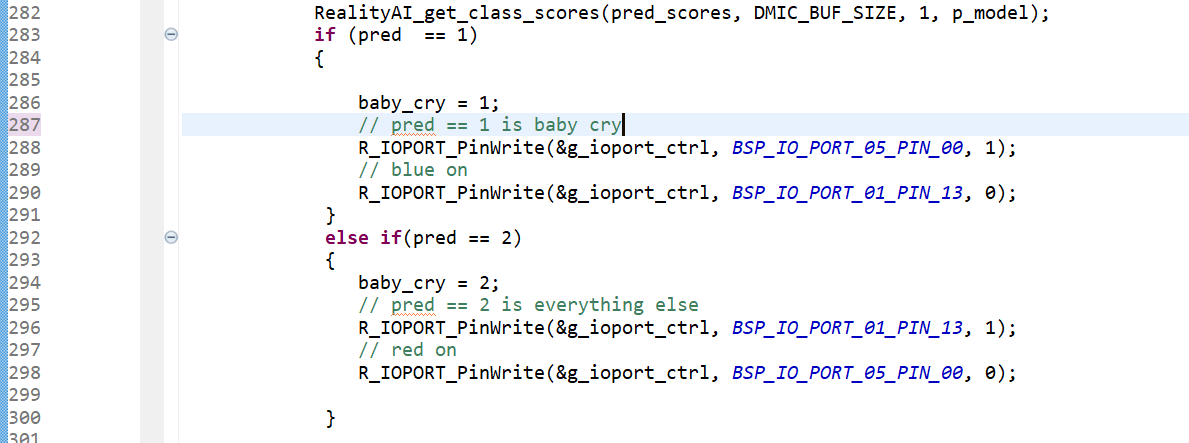
Building and Running the Project
- Build and debug the project as done previously.
- Start the debug session.
- Click the Resume button twice to run the board in inference mode.
Monitoring Model Predictions in Real Time
To check the model accuracy and predictions,
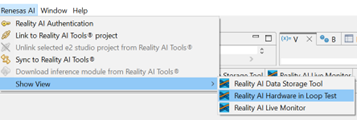
- Navigate to Renesas AI > Show View > Reality AI Live Monitor.
- Ensure the Data Storage Tool connection is disconnected before proceeding.

- In the Reality AI Live Monitor view:
- Click Data Connection.
- Set the Baud Rate to 921600.
- Select the appropriate COM Port.
- Once connected, live model predictions should appear.
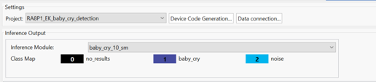
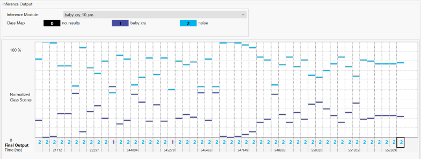
- Class
1represents theeverything_elseclass. - Class
2represents thebaby_cryclass. - The dominant class will display higher on the Class Score (y-axis).
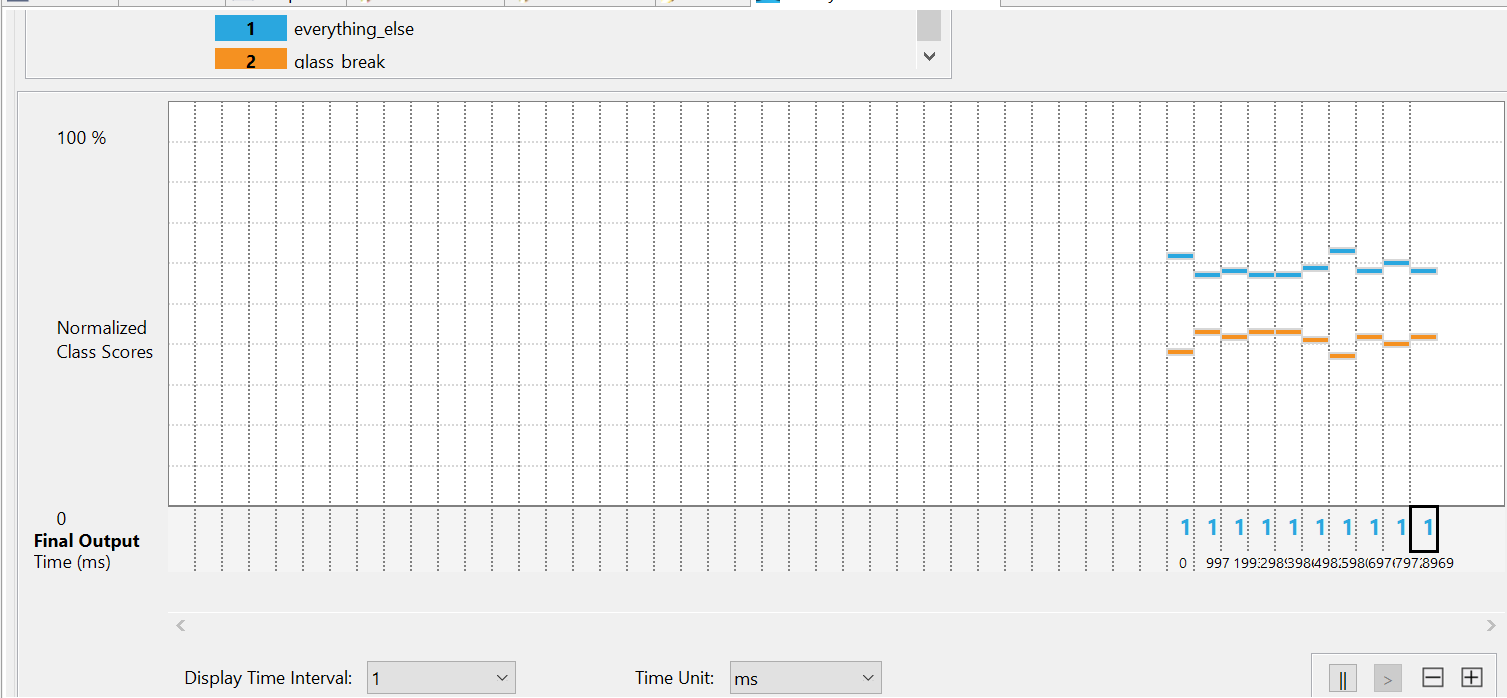
Play Baby Cry audio samples from a device such as a smartphone or a PC speaker.
You should observe the number 2 appearing along the x-axis, with corresponding orange bars rising higher on the y-axis.
Troubleshooting Model Performance
What should I do if model is not performing well?
- Collect additional training data across different conditions and retrain the model.
- Ensure that the data collection method and testing method are consistent.
- More data collection covering a wider range of scenarios typically improves model accuracy and robustness.
Validating the Model Using Hardware In-Loop Testing
To validate the model on the board for the already collected data,
-
In e² Studio, navigate to Renesas AI > Hardware In-Loop Test.
-
Select the inference package/model:
- Choose the trained model from your Reality AI Tools account.
- If you have Explorer Tier access, you can use the pre-loaded
baby_cry_lsp_v1model.
-
Verify that the board is properly connected and the correct COM Port is selected.
-
Click Start Test.
-
The plugin will:
- Automatically generate a new project directory on your drive for hardware testing.
- Download simulation data (a portion of the training data) and use it for testing the model on the hardware.

-
Once the test begins, you will see metrics such as Inference Time and Overall Accuracy displayed on the screen.

Introduction - EK-RA8P1
This tutorial provides a complete walkthrough for developing and testing a Baby Cry Detection model using Renesas’s EK-RA8P1 User Interface Kit and Reality AI Tools (Explorer Tier). Reality AI Tools enables AI model generation for non-visual sensing applications.
By the end of this tutorial, you will:
- Set up the development environment.
- Collect and upload labeled audio data.
- Build and train an AI model.
- Deploy and test the model on the EK-RA8P1 hardware.
Follow the sections sequentially for best results.
Overview of the sections
| Section | Description |
|---|---|
| 1 | Setting Up the Environment |
| 2 | Data Collection |
| 3 | Model Generation |
| 4 | Deploying & testing |
Section 1: Setting Up the Environment
This section covers the prerequisites for running the Baby Cry detection demo.
To complete this tutorial, ensure that you have the following:
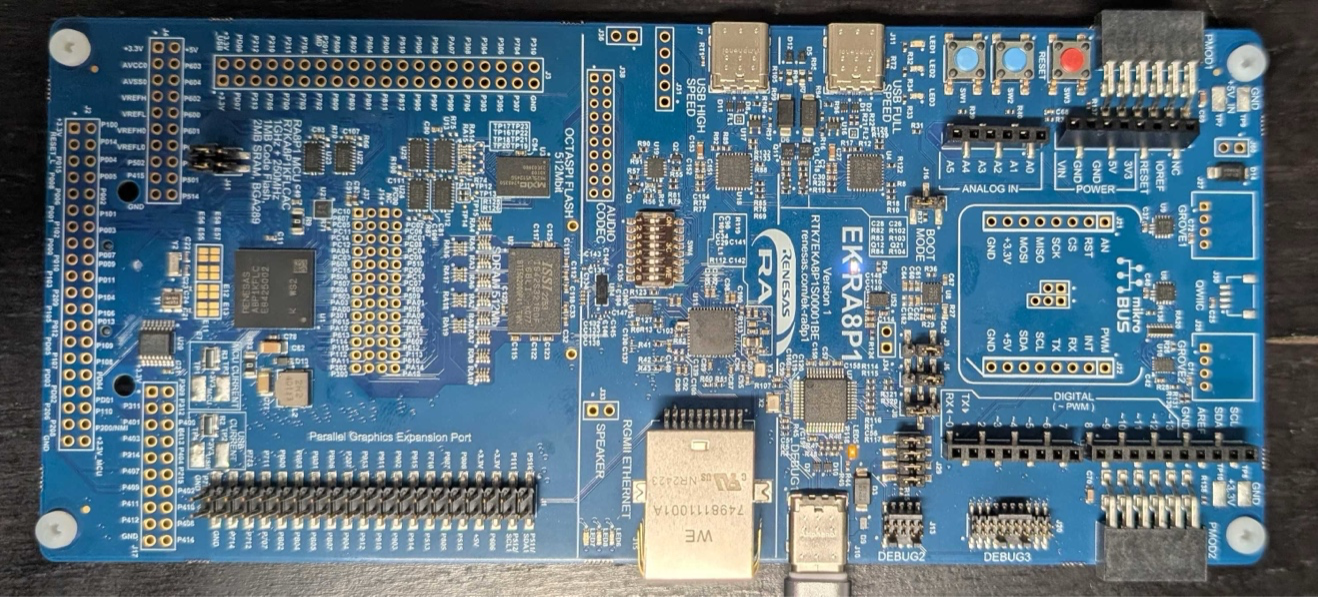
- EK-RA8P1 User Interface Kit, which includes:
- RA8P1 board
- Necessary USB cables to connect to Type - C debug port
-
Renesas e² Studio IDE, version 2024-07 or newer, with Flexible Software Package (FSP) 5.6.
-
Reality AI Tools account access:
- Log in to Reality AI Tools using the provided username and password.
- If you need credentials for the Reality AI portal or access to the pre-configured e² Studio project, contact the Renesas AI COE Customer Success team at rai-cs@dm.renesas.com.
Keep the Reality AI Tools portal open in the background during the lab.
Section 2: Data Collection
This section describes how to collect data using the Reality AI Eclipse plugin integrated into e² Studio.
Setting Up the Workspace, Project, and Data Connection
- Open e² Studio Launcher and click Browse to select a workspace.
- Click Launch.
- Navigate to File > Import.
- In the Import window, under General folder, select Existing Projects into Workspace.
- Click Next to continue.
- Select Select root directory, then click Browse to locate the example project folder.
- Complete the project import into the workspace.
Creating and Setting Up the Project in Reality AI Tools
- In the Reality AI Tools portal, create a new project:
- Click +Add Project.
- Enter a project name and, optionally, a description.
- Click the +Add Project button in the lower-right corner.
If you are using an Explorer Tier subscription, you can skip creating a new project and use the existing Baby Cry Detection project to upload and analyze data.
Connecting e² Studio to Reality AI Tools
-
In the Reality AI portal, click your username in the top-right corner and select API Key.
-
Copy the displayed API key to the clipboard. This key is required to connect e² Studio IDE to Reality AI Tools.
-
Return to e² Studio IDE and navigate to Renesas AI > Reality AI Authentication.
(If the Renesas AI menu does not appear, refer to the appendix for troubleshooting.) -
Click Add to add a new API key and connect the account to your workspace.
-
Paste the API key, then click Apply and Close.
The IDE is now connected to Reality AI Tools.
Configuring the Data Storage Tool and Device Communication
- Navigate to Renesas AI > Reality AI > Reality AI Utilities > Reality AI Data Storage Tool.
A new window will open in the bottom pane. - Click and drag the Reality AI Data Storage Tool view to the main view area.
- In the dropdown list, select the imported project.
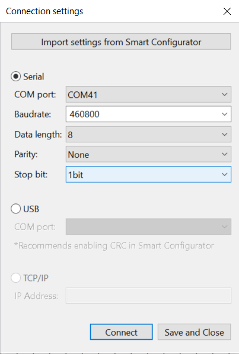
- Click the Data Connection button.
- In the connection menu:
- Select the correct COM port.
- Set the baud rate to 460800.
- Confirm communication parameters Data length - Parity - Stop bit as 8-N-1.
- Click Connect, then Close.
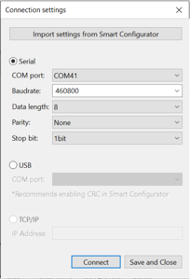
- Verify that the status in the top-left shows Receiving data... with a green check mark.
(The green check mark indicates successful connection, not active data reception.)
Building and Running the Project
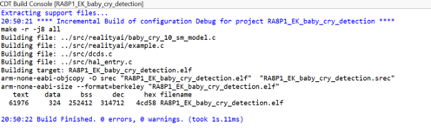
- Build the project by clicking the Hammer icon.
- Ensure the project builds without errors.
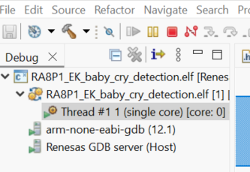
- Start a debug session by clicking the Debug icon in the toolbar.

- If prompted by Windows Defender, click Allow access.
- If a dialog box appears asking to switch perspectives, check Remember my decision and click Switch.
- Click the Resume button twice. The program will begin running.
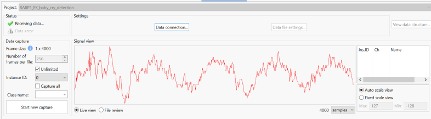
Verifying Device Data Capture
- Open the Reality AI Data Storage Tool view and check for waveform activity in the Signal view.
- If no waveform is visible, switch to File Review and then back to Live View (highlighted below).
- If the waveform is still absent, recheck the prerequisite steps to make sure the connections are correct.
Capturing Data
- In the Reality AI Data Storage Tool:
- Enter a name in the Class Name text box.
- Enable the Unlimited checkbox to allow variable-length data capture.
There are two methods to collect data:
- Number of frames per file: Stops data collection after reaching the specified number of frames.
- Unlimited: Data collection continues until manually stopped.
For this project, use the Unlimited setting. Setting Number of frames per file to 200 typically captures about 52 seconds of audio. However, this tutorial assumes Unlimited capture.
-
To record Baby Cry audio:
- Set Class Name to
baby_cry. - Play provided Baby Cry audio files using a phone or PC speaker while recording.
- Set Class Name to
-
To record background/environmental sounds:
- Set Class Name to
everything_else. - Record ambient audio such as quiet room noise, typing, or speaking for 2–3 minutes. The goal is to capture a representative sample of the surrounding environment.
- Set Class Name to
-
To complete data capture, click the Red Square (Terminate Debug Session) icon.
If the terminate icon is not visible, switch to the Debug perspective in the upper right corner in e² Studio.
Uploading Captured Data
The collected data will be displayed in the list of metadata/file description. You can upload this data to Reality AI Tools using Upload and run analysis on it.
Follow these steps to upload the collected data to Reality AI Tools:
-
In the Manage capture data files section, select the recorded data files (use Ctrl+Click to multi-select).
-
Scroll down to reveal the Upload button.
-
Click Upload.
-
In the upload dialog:
- Select the project created earlier (e.g., Baby Cry Demo) on the Reality AI website.
- Set the sampling rate to 16000 Hz.
-
Click OK.
-
Wait for a confirmation message indicating successful upload.
The metadata and the data files will now appear in Reality AI Tools.
Section 3: Model Generation
This section describes how to create AI models using the collected dataset. A Reality AI Tools Explorer Tier account is required.
If you need credentials or portal access, contact the Renesas AI COE Customer Success team at rai-cs@dm.renesas.com.
Preparing the Dataset for Formatting
-
If not already logged in, access Reality AI Tools at https://portal.reality.ai/login using your provided credentials.
-
In the Reality AI Tools portal, set the Baby Cry Demo project as active.

-
Click the Data tab on the left panel to expand the view.
-
Click Curate.
-
Expand Source Files.
-
Select all files by checking the box next to File Name.
-
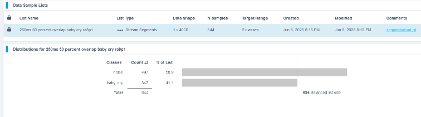
Click the Action button, then select Format Selected.
Formatting the Data
When the formatting dialog opens, perform the following steps:
- Click Data to expand the dropdown list.
- Use the scrollbar (or mouse wheel) to navigate through the list.
- Set the second class as the Target Class.
- Assign the Sample Rate to 16000 Hz.
- Click Confirm.
Verify that:
- The data shape now displays as 1 × (number of samples).
- The sample rate is 16000 Hz.
Preprocessing and Segmenting the Data
- Click the Action button again and select Segment List from Selected.
Why Segmentation?
Segmenting the data prepares it for deployment on Renesas MCUs, which require models to process short windows of live data. These models must process live data within a resource constrained environment. Instead of feeding several seconds or minutes of continuous audio, the model analyzes brief windows (e.g., 1 second or 500 milliseconds or even smaller) to make quick predictions. To mimic that effect, we break down the raw training data and feed that to the model generation engine to start learning what it is going to see in a live (production) setting.
- In the Segment Files dialog, perform the following actions:
- Set Window Length to 4000 samples.
- Click the 50% button to set a 50% Offset (overlap).
- Provide a meaningful name for the Output Sample List.
- Click Submit.
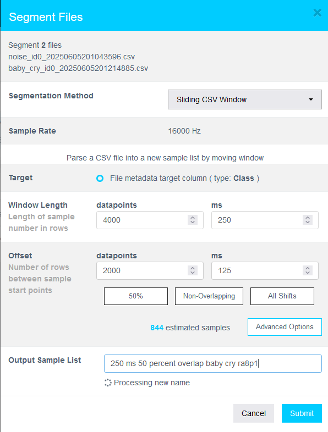
The number of estimated samples depends on the amount of data collected. It is acceptable if your sample count does not exactly match the example shown.
Definitions:
- Window Length: Defines how much data the AI model considers for making a classification decision.
- Offset: Defines how far ahead the next window starts after the previous one.
- A 50% overlap provides a good balance between variation coverage and redundancy.
- Use non-overlapping windows if you have a large dataset with longer offsets. Typically, users will do initial exploration and training on a subset of the available data.
- Use "All Shifts" (offset = 1) when testing a finalized model or a suitable candidate classifier to simulate performance on a stream of new data arbitrarily sampled.
- After successfully creating the segmented list, navigate to AI Explore > Classes.
Reality AI Tools offers three types of AI model training:
- Classes: For labeled categorical data (used in this tutorial).You might have noticed that we uploaded perfectly labeled data in section 1. Labeled datasets are required for supervised learning.
- Values: For regression tasks predicting numeric values (e.g., temperature, tire pressure) of int and float type. This is also supervised learning.
- Anomalies: For anomaly detection models, using only examples of normal data to build a baseline. It is a semi-supervised model.
Exploring and Training the Model
- Select the newly created segmented list.
- Click Start Exploring to begin feature discovery and model training.
What happens during exploration?
- Clicking Start Exploring initiates automatic model generation by Reality AI Tools.
- It will create several optimized feature sets and machine learning models that best fit the classification problem and then summarize each model’s accuracy and resource consumption.
- The system:
- Creates a balanced subset of the uploaded samples (equal examples per class)
- May perform sub-sampling for a shorter processing time if the dataset is exceptionally large.
- Discovers the best feature sets and machine learning parameters for separating the different training classes represented in the data.
- Builds multiple machine learning models using feature sets that are most promising, which are trained on the sub-sample.
- Performs K-Fold Validation (K=10) to evaluate models.
- Displays only the best-performing results.
- Typically, several hundred feature sets and models are evaluated during a single AI Explore run.
What is K-Fold Validation?
- K-Fold Validation splits the dataset into K sections (folds).
- Each fold is used once as a testing set, while the remaining folds are used for training.
- Example: In 10-Fold validation (K=10), the data set is split into 10 folds. In the first iteration, the first fold is used to test the model, and the rest are used to train the model. In the second iteration, the 2nd fold is used as the testing set while the rest serves as the training set. This process is repeated until each fold of the 10 folds has been used as the testing set.
- Reality AI Tools uses K=10 by default on the AI Explore page.
Selecting and Saving the Best Model
- After exploration completes, review the generated models.
- Select the highest-performing model.
(Recommended: Choose a model with the Spectral Magnitude feature space.) - Click Create Base Tool.
- Hover over each Explanation to understand key details about each model.

- Provide a name for the Base Tool, or accept the suggested name.
- Click Add.
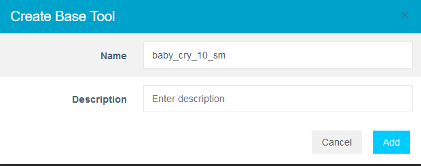
The icon will update to indicate that the Base Tool has been created.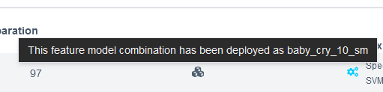
Packaging the Model for Deployment
Now the model is ready to be deployed. Follow these steps to produce a new package.
- Navigate to Deploy > Embedded.
- In the Trained Tool Description list, select the Base Tool created earlier.
- Click + New Package.
- Configure the package settings as needed.
- It is recommended to use the deployed name
baby_cry_lsp_v2to match the references in the e² Studio project. - If you use a different name, you must update references in the project code accordingly.
- It is recommended to use the deployed name
- Click Submit to generate the deployment package.
It may take approximately 10 to 15 minutes for the package to be ready for download.
- Once available, download the generated .zip archive.
- Extract the archive. It should contain nine files.
- Copy and paste all extracted files into the following project's src directory in e² Studio project workspace:
src > realityai
Overwrite the existing files when prompted.
File names may vary depending on the project name assigned in Reality AI Tools.
In the updated files, the model function call is referenced in the header file baby_cry_10_sm.h.

Section 4: Deploying & testing the model
This section explains how to deploy the trained model to the hardware and validate its performance.
Updating the Project Code
- Open the
hal_entry.cfile in e² Studio. - Verify the model header file:
- If the deployed model name is
baby_cry_10_sm, no changes are required.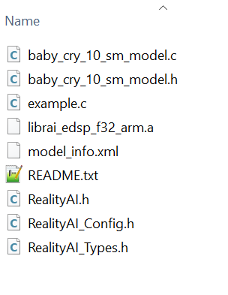
- If a different name was used, update line 37 to reference the correct model header file.
- If the deployed model name is
- Update the class name:
- Locate line 286.
- Replace
baby_crywith the class name you assigned for the Baby Cry event during data capture.

Building and Running the Project
- Build and debug the project as done previously.
- Start the debug session.
- Click the Resume button twice to run the board in inference mode.
Monitoring Model Predictions in Real Time
To check the model accuracy and predictions,
- Navigate to Renesas AI > Reality AI > Reality AI Utilities > Reality AI Live Monitor.
- Ensure the Data Storage Tool connection is disconnected before proceeding.
- In the Reality AI Live Monitor view:
- Click Data Connection.
- Set the Baud Rate to 921600.
- Select the appropriate COM Port.
- Once connected, live model predictions should appear.
- Class
1represents theeverything_elseclass. - Class
2represents thebaby_cryclass. - The dominant class will display higher on the Class Score (y-axis).
Play Baby Cry audio samples from a device such as a smartphone or a PC speaker.
You should observe the number 2 appearing along the x-axis, with corresponding orange bars rising higher on the y-axis.
Troubleshooting Model Performance
What should I do if model is not performing well?
- Collect additional training data across different conditions and retrain the model.
- Ensure that the data collection method and testing method are consistent.
- More data collection covering a wider range of scenarios typically improves model accuracy and robustness.