Glass break detection demo
- Renesas VK-RA6E1
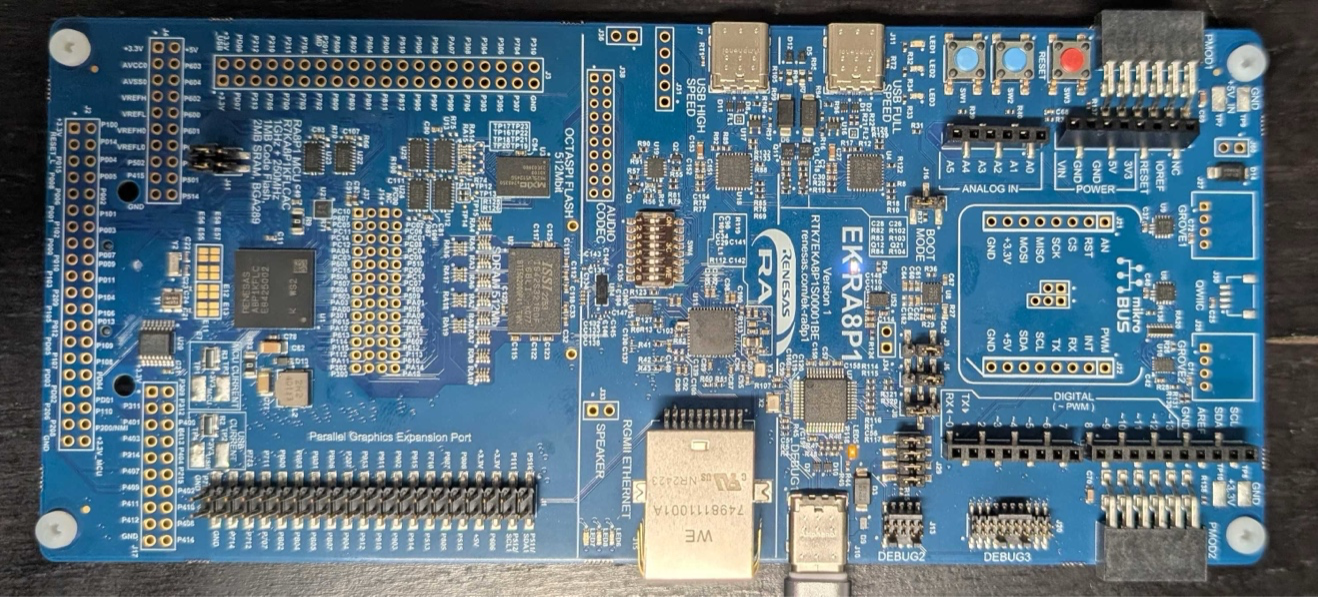
- Renesas EK-RA8P1
Introduction - VK-RA6E1
This tutorial demonstrates the development and testing of a Glass Break Detection demo using Renesas’s VK-RA6E1 Voice User Interface Kit and Reality AI Tools (Explorer Tier). Reality AI Tools enables the creation of AI models for non-visual sensing applications.
Overview of the sections
| Section | Description |
|---|---|
| 1 | Prerequisites |
| 2 | Data Collection |
| 3 | Model Generation |
| 4 | Deploying & testing |
Follow the sections sequentially for best results.
Section 1: Prerequisites
This section outlines the hardware, software, and account prerequisites for running the Glass Break Detection demo.
Hardware Requirements
To complete this tutorial, you will need the VK-RA6E1 Voice User Interface Kit.
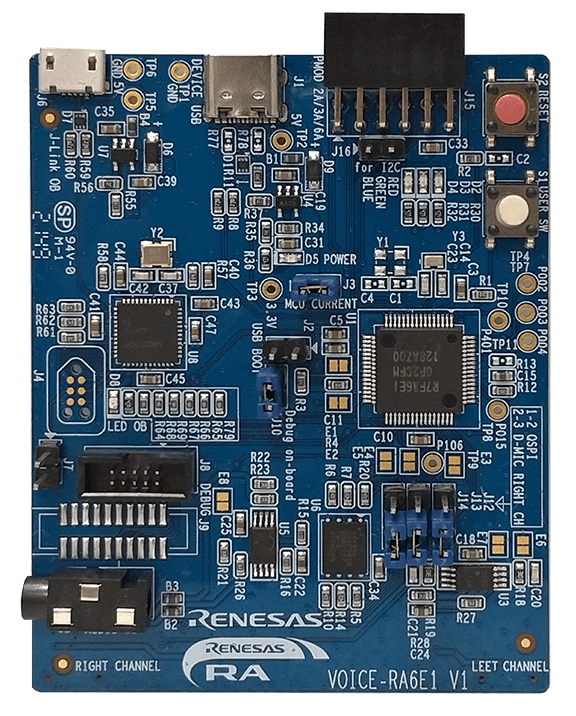 The kit includes:
- RA6E1 board
- USB cables (included)
Kit link:
TW001-VUIA6E1POCZ - RA6E1 Voice User Demonstration Kit | Renesas
Software Requirements
Install the following software before proceeding:
- Renesas e² Studio IDE, version 2024-07 or newer
- Flexible Software Package (FSP) version 5.6
Download the platform installer:
setup_fsp_v5_6_0_e2s_v2024-10.exe
After installation, take note of the e² Studio installation directory.
You will also need the pre-configured e² Studio project for this lab, which contains all required settings and files. You can download the project here.
Reality AI Tools Account Access
To access Reality AI Tools:
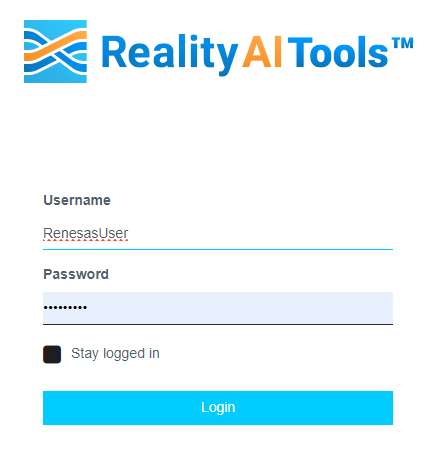
- Navigate to the login portal: https://portal.reality.ai/login
- Log in using your assigned username and password.
If you do not have credentials or access to the project files, contact the Renesas AI COE Customer Success team at rai-cs@dm.renesas.com.
Keep the Reality AI Tools portal open in the background during the tutorial.
Section 2: Data Collection
This section explains how to use the Reality AI Eclipse plugin in e² Studio to collect labeled audio data for the Glass Break Detection demo.
Import the Example Project into e² Studio
-
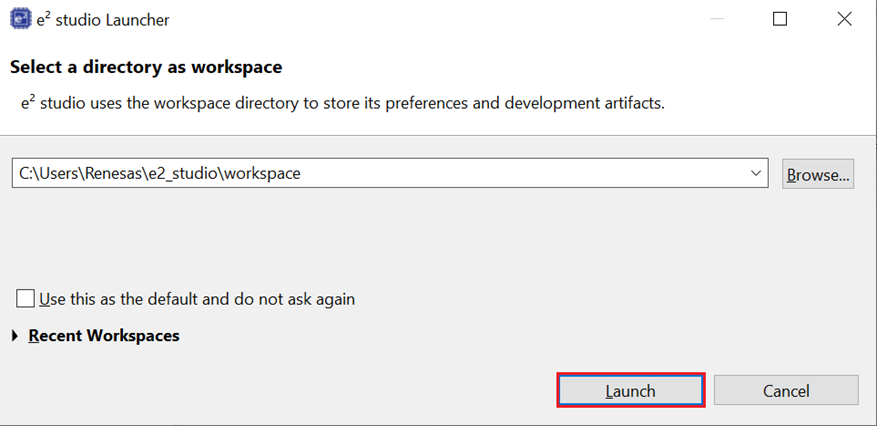
Open e² Studio IDE, and in the Launcher, click Browse to choose a workspace directory.
-
Click Launch to proceed.
-
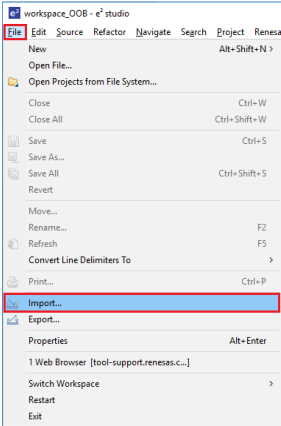
Navigate to File > Import in the top menu bar.
-
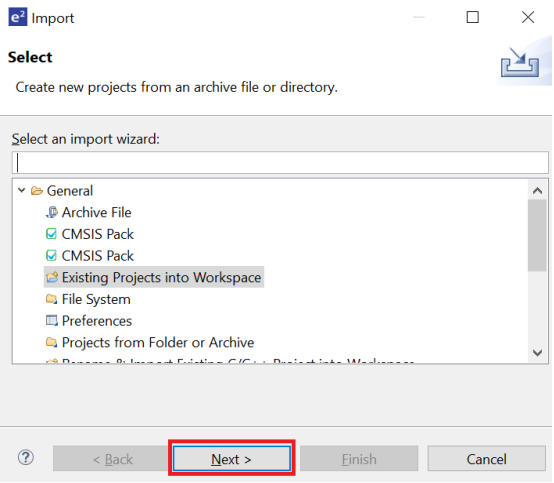
Under General, select Existing Projects into Workspace and click Next
-
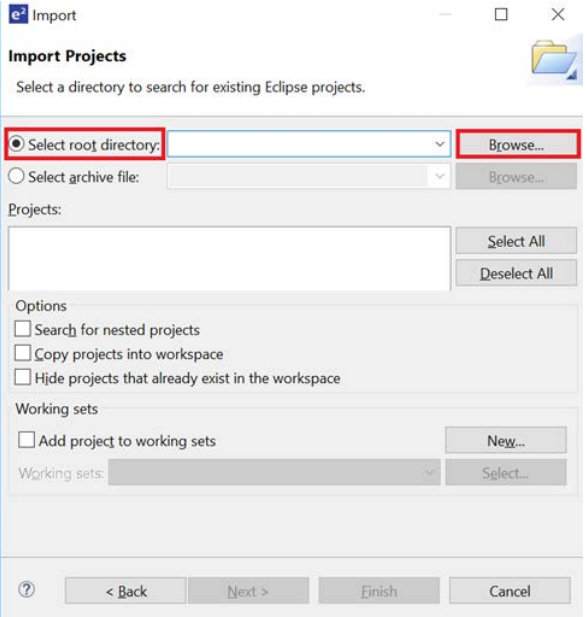
Click Select root directory, then Browse to locate the example project folder.
-
Click Finish to import the demo project into your workspace.
Create or Select a Project in Reality AI Tools
-
Open the Reality AI Tools portal.
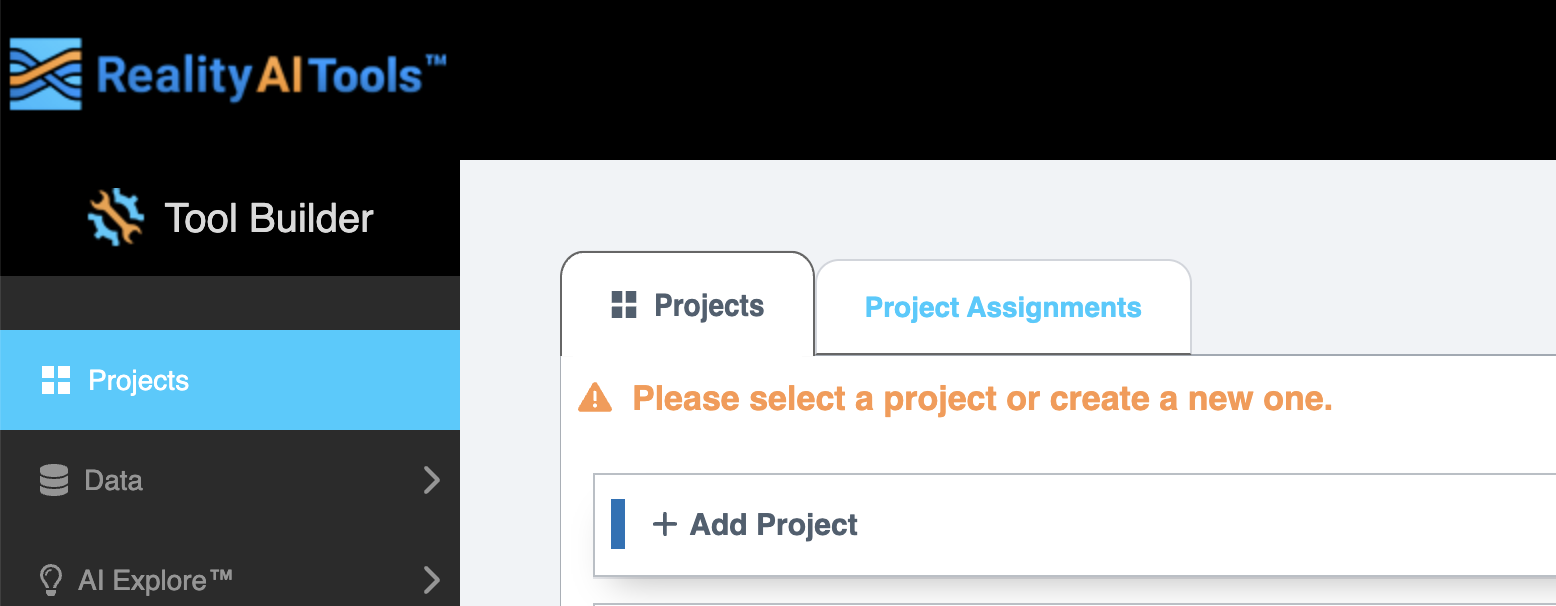
-
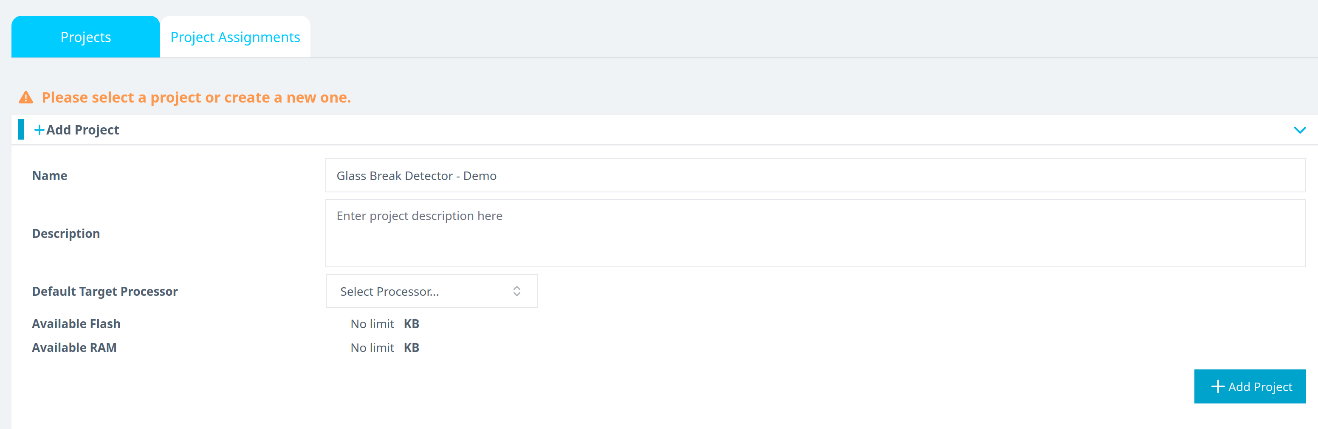
Click +Add Project.
-
Enter a project name (e.g., Glass Break Demo) and optionally provide a description.
-
Click +Add Project in the lower-right corner.
If you're using an Explorer Tier subscription, you can skip creating a new project and use the existing Glass Break Detection project to upload and analyze data.
Generate and Apply an API Key
-
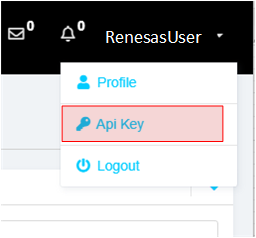
In the Reality AI portal, click your username in the top-right corner and select API Key.
-
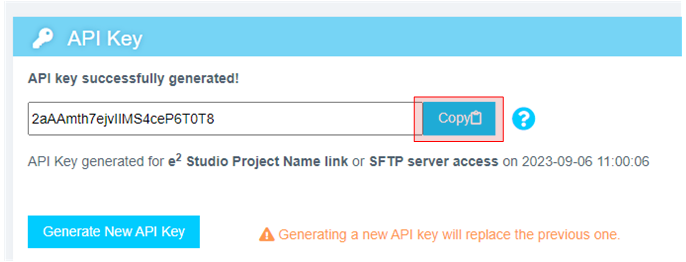
Copy the displayed API key. This key will be used to authenticate e² Studio with Reality AI Tools.
-
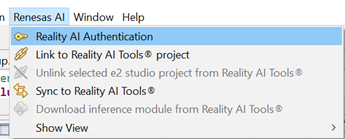
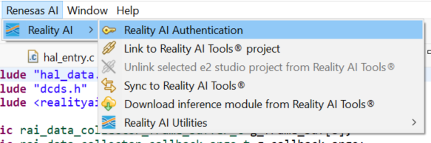
Return to e² Studio and navigate to Renesas AI > Reality AI Authentication.
(If the Renesas AI menu is missing, refer to the appendix for troubleshooting.)
-
Click Add, paste the API key, and click Apply and Close.
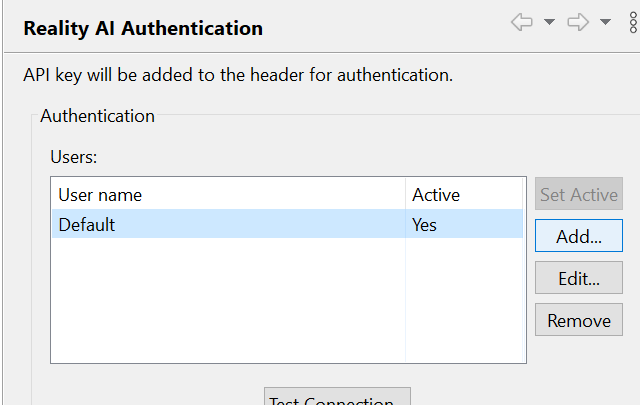

Once added, e² Studio is now connected to Reality AI Tools.
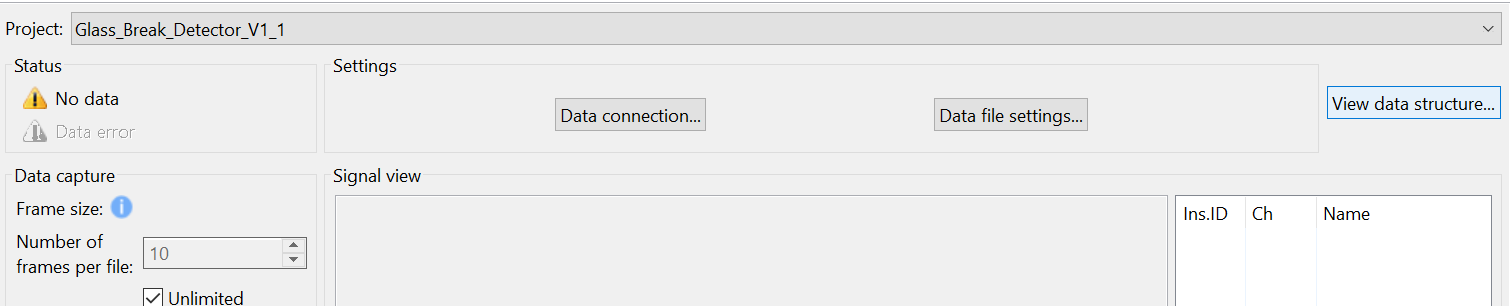
Configure the Reality AI Data Storage Tool
-
In e² Studio, go to Renesas AI > Show View > Reality AI Data Storage Tool.
-
A new panel will open at the bottom. Drag the tab to the main editor area if needed.
-
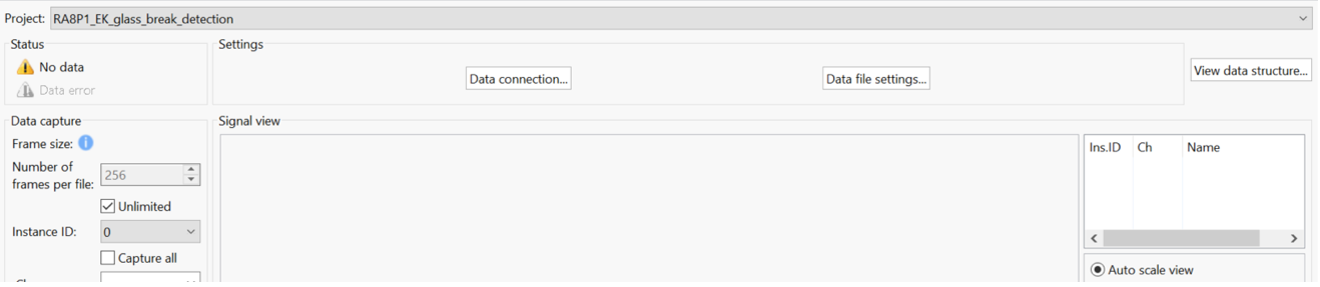
In the Reality AI Data Storage Tool, select your project from the dropdown list.
-
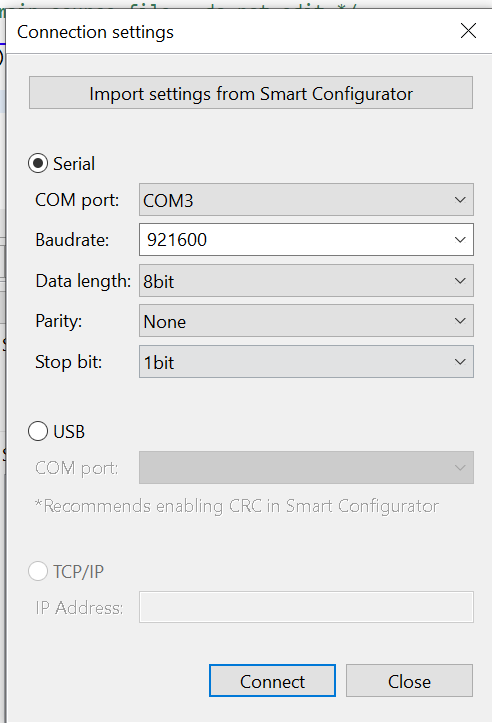
Click Data Connection.
-
In the dialog that appears:
- Choose the correct COM port.
- Set Baud Rate to
921600. - Set communication parameters to 8-N-1.
- Click Connect, then Close.
-
Confirm that the status in the top left shows Receiving data... with a green check mark.
This indicates a successful connection, not actual data collection.
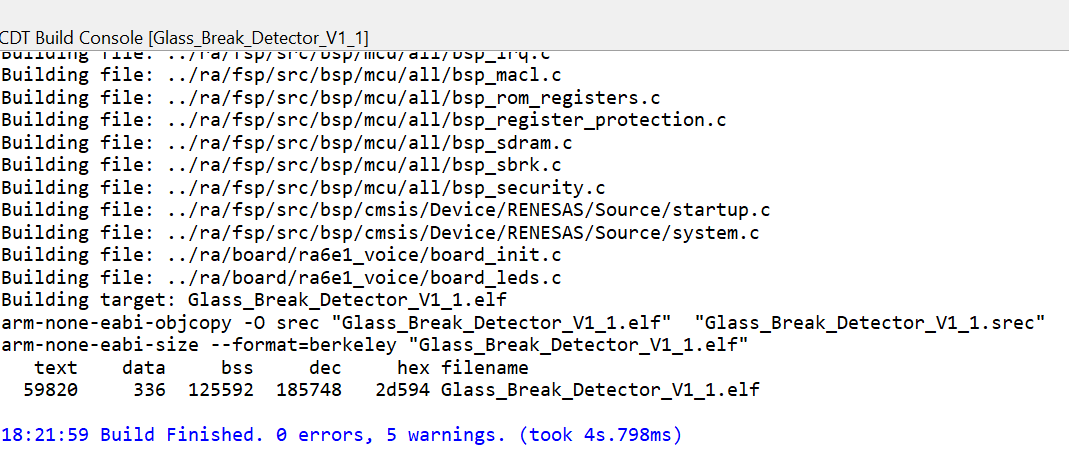
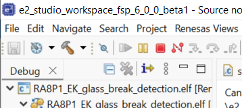
Build and Run the Project
-
Click the Hammer icon to build the project.

-
Ensure the build completes without errors.
-
Click the Debug icon to start a debug session.

-
If prompted by Windows Defender, click Allow Access.
-
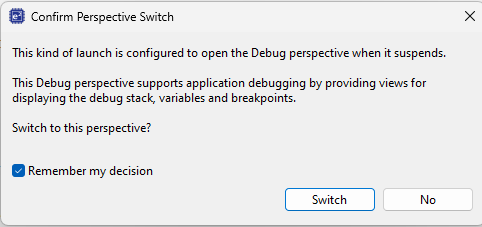
If prompted to switch perspectives, check Remember my decision and click Switch.
-
Click the Resume button twice to begin program execution.

Verify Signal in Data Storage Tool
-
In the Reality AI Data Storage Tool, go to the Signal view to confirm waveform activity.
-
If the waveform is not visible:
- Click File Review, then switch to Live View (highlighted below).
- If the waveform is still not visible, verify all previous steps and ensure device connection.
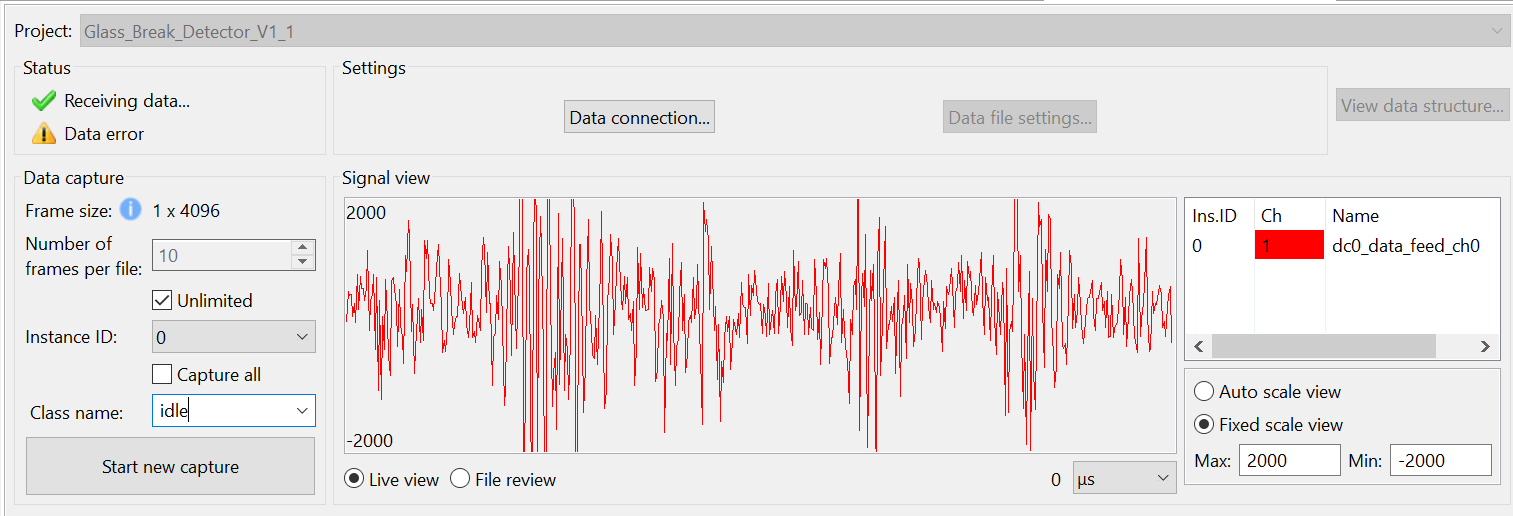
Record Class-Specific Audio Data
-
In the Reality AI Data Storage Tool, enter a name in the Class Name field.
-
Select the Unlimited checkbox to record variable-length data.
There are two data collection modes:
- Unlimited: Recording continues until manually stopped.
- Number of frames per file: Automatically stops when the set frame count is reached.
For this tutorial, select Unlimited.
Setting the number of frames to 200 captures approximately 52 seconds of data.
-
Enter the class name as
glass_break. -
Play the provided glass break audio clips through your phone or PC speakers while recording.
-
Once done, start a new recording session.
-
Change the class name to
everything_else. Record environmental sounds such as silence, typing, or talking for 2–3 minutes.The goal is to capture ambient noise for model contrast.
End Data Collection
- Click the Red Square icon to terminate the debug session.
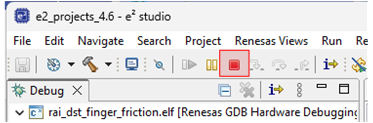
If the icon is not visible, switch to the Debug perspective.
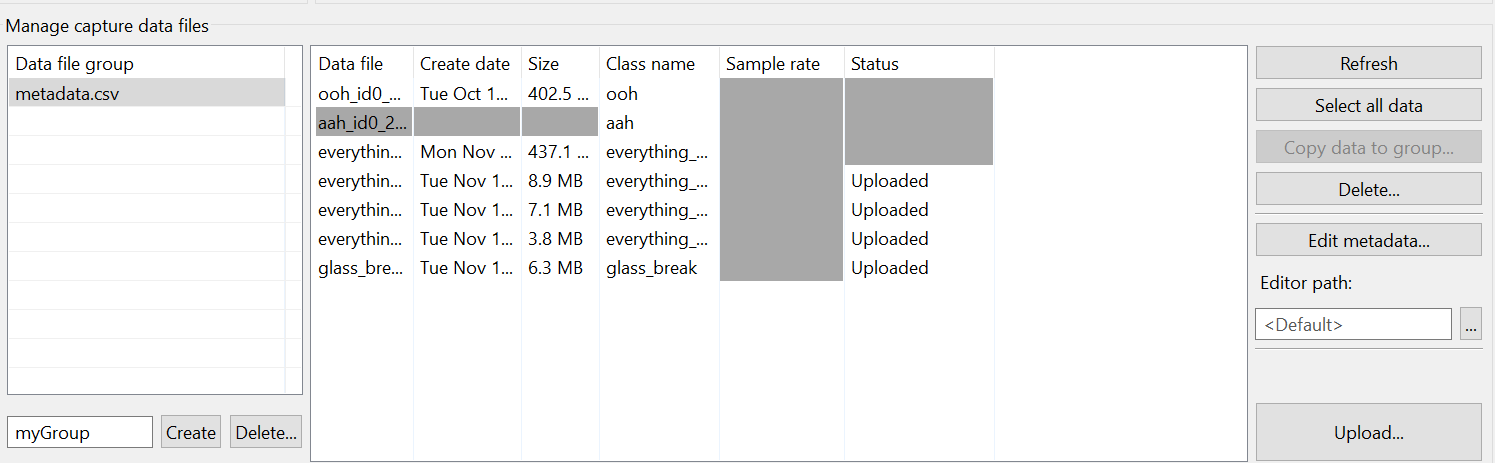
- The collected data should now appear in the list of recorded files, along with metadata.
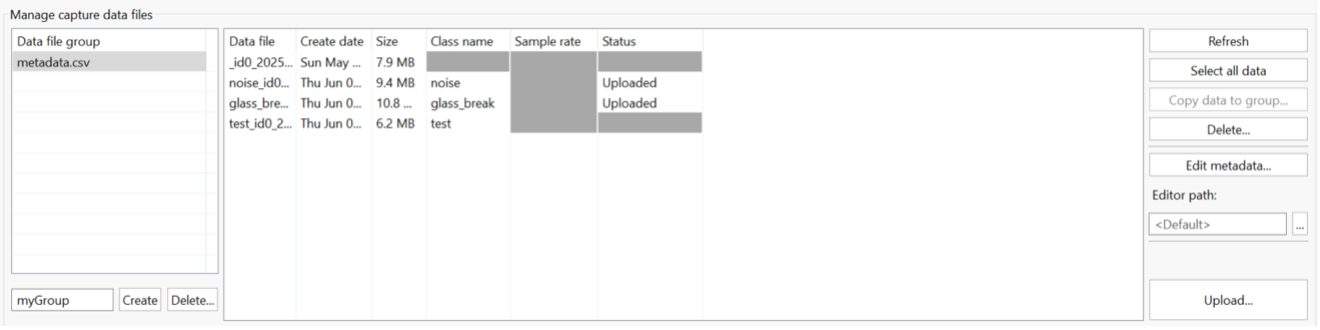
Upload Data to Reality AI Tools
You can now upload the data to Reality AI Tools using Upload and run analysis on it.
-
Select all recorded data files (use Ctrl + Click to select multiple files).
-
Scroll the tool window to reveal the Upload button.
-
Click Upload.
-
In the dialog box:
- Choose the appropriate project (e.g., Glass Break Demo).
- Set the Sampling Rate to
4096 Hz.
-
Click OK to upload the data.
-
After upload, a confirmation message will appear. The data and
metadata.csvfile will now be available in your Reality AI Tools project.
Section 3: Creating Models
This section explains how to create an AI model using the labeled data collected in the previous step. You will format, segment, train, and finally deploy the model using Reality AI Tools.
A Reality AI Tools Explorer Tier account is required. If you do not have access, contact the Renesas AI COE Customer Success team at rai-cs@dm.renesas.com.
Log in to Reality AI Tools
-
Open a browser and go to https://portal.reality.ai/login.
-
Log in using the credentials provided by Renesas.
Format the Collected Data
-
Select the Glass Break Demo project to set it as the active project.

-
On the left sidebar, click the Data tab to expand it.
-
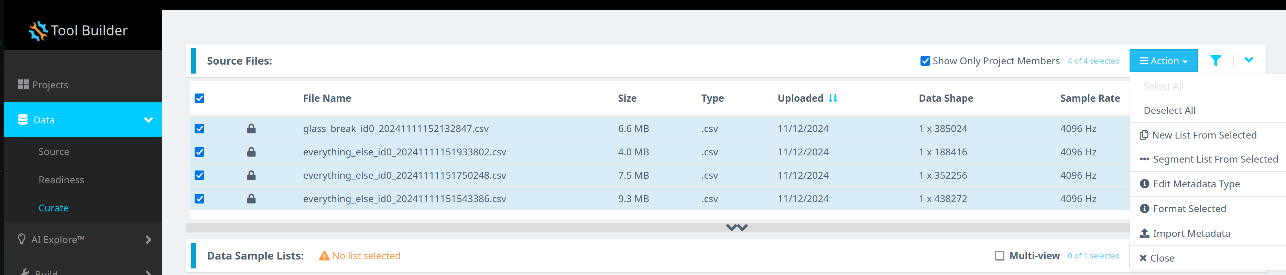
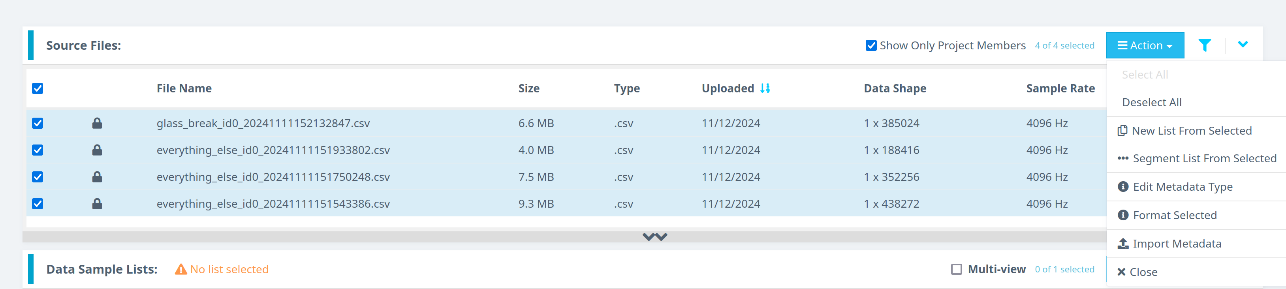
Follow these steps:
- Click Curate.
- Expand the Source Files section.
- Select all files by checking the box next to File Name.
- Click the Action button.
- Choose Format Selected.
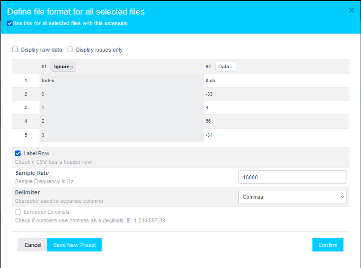
-
In the formatting dialog:
- Expand the Data dropdown menu.
- Use the scroll bar or mouse wheel to navigate.
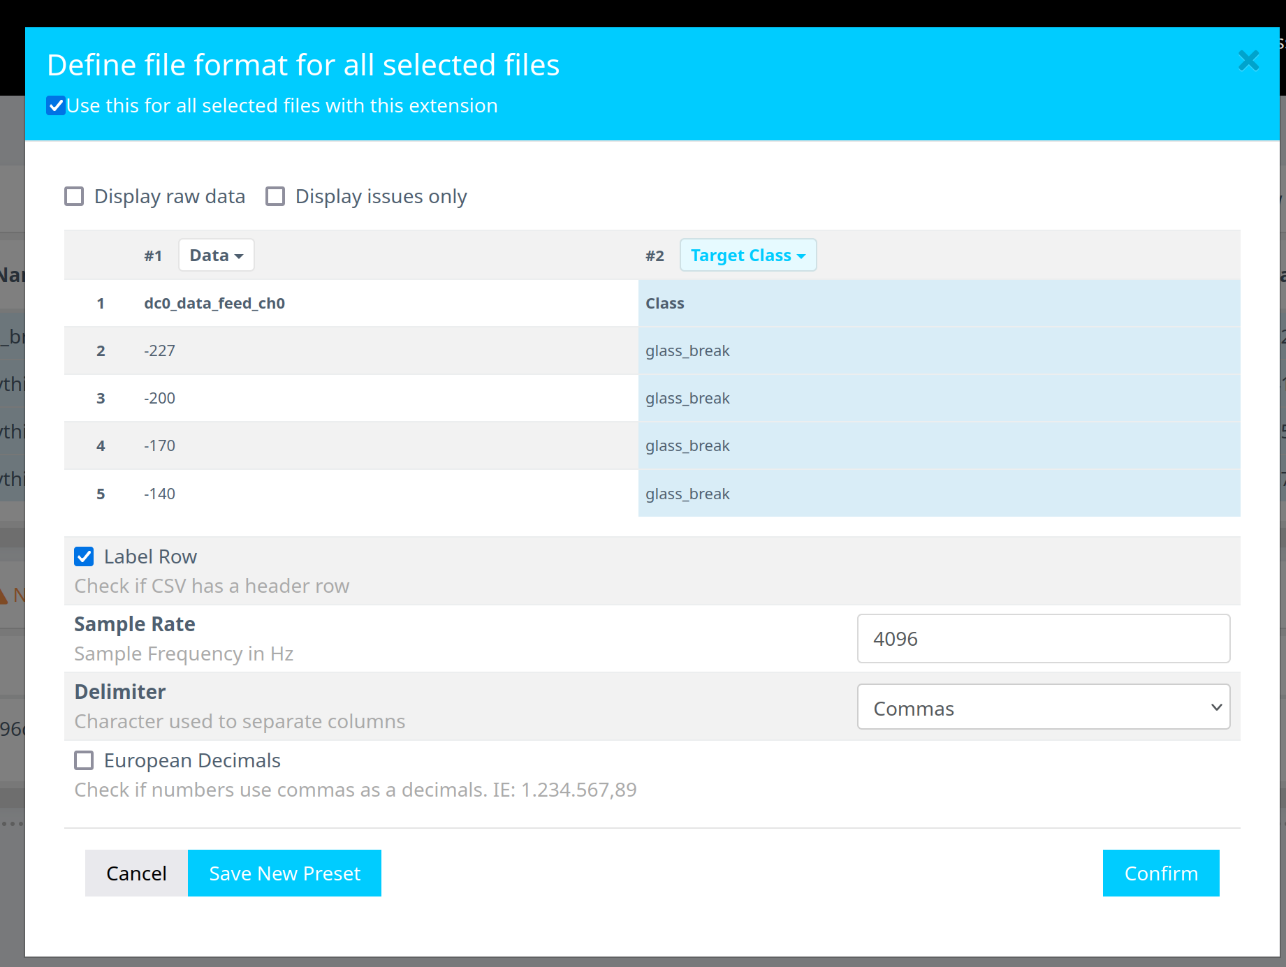
- Set the second class as the Target Class.
- Assign the Sample Rate to
4096 Hz. - Click Confirm.
-
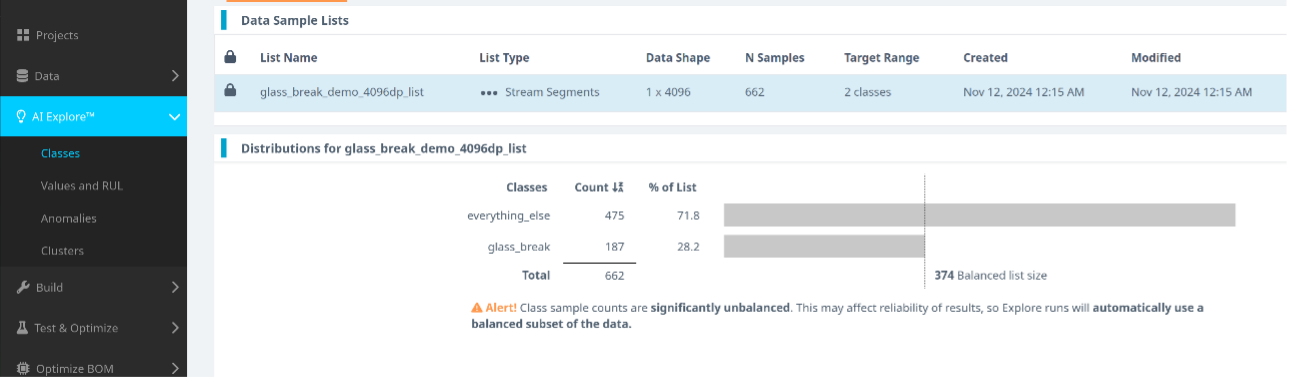
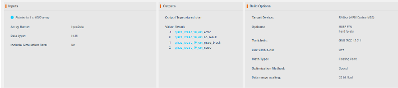
Confirm that:
- The Data Shape is
1 x (number of samples). - The Sample Rate is
4096 Hz.

- The Data Shape is
Segment the Data for Model Training
-
In the Curate page, click the Action button again.
-
Select Segment List from Selected.
Why Segmentation? One of the primary goals of using Reality AI Tools is to generate models that can be deployed on various Renesas MCUs. These models are expected to operate in resource-constrained environments and must process live data efficiently. For practical real-time performance, the models are typically designed to analyze short time windows—such as 1 second, 500 milliseconds, or even less—rather than extended data streams lasting several seconds, minutes, or hours. To replicate these conditions during training, the raw data is segmented into shorter windows and fed into the model generation engine, enabling the model to learn patterns similar to those it will encounter in a live production environment.
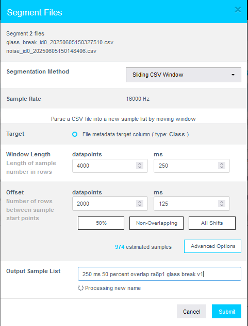
- In the segmentation dialog, do the following:
- Set Window Length to
4096. - Click the 50% button to select a 50% offset.
- Enter a descriptive name for the segment list.
- Click Submit.
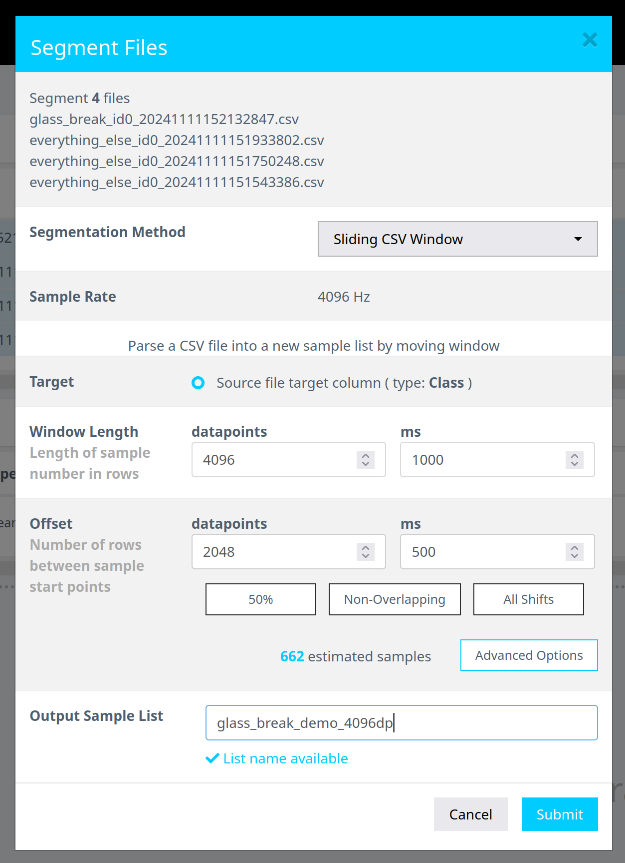
- Set Window Length to
Note: The estimated number of samples depends on your data volume. Your sample count may differ from the screenshots shown.
Terms:
-
Window Length: The number of samples per segment the model uses to classify an input.
-
Offset: The amount of overlap between segments.
-
50% Overlap: A standard choice to balance coverage and data diversity.
-
Use non-overlapping segments for large datasets.
-
Use all shifts (offset = 1) to simulate a continuous stream of live data for validation.
Launch AI Explore to Train the Model
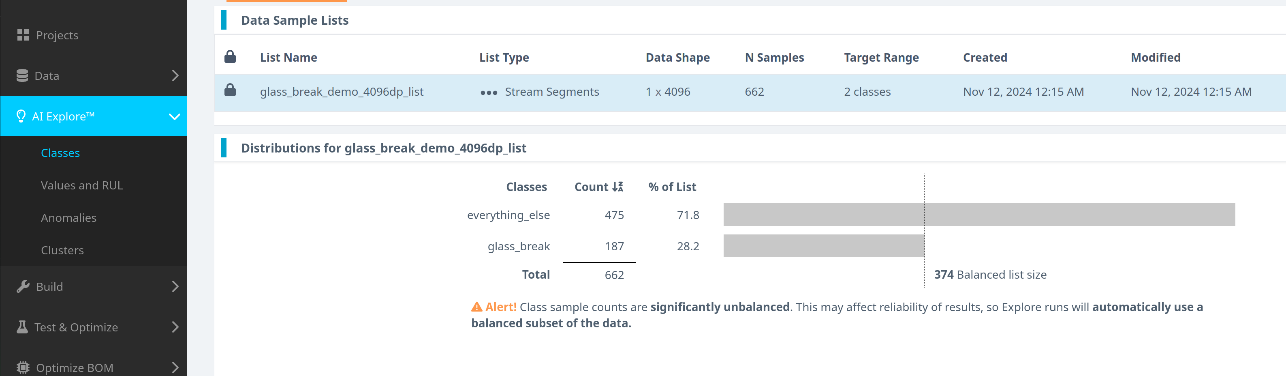
- Go to AI Explore > Classes in the Reality AI portal.
Reality AI Tools supports three types of models:
- Classes: When there is labeled categorical data for categorical classification (used in this tutorial). You might have noticed that we uploaded perfectly labeled data in section 1. This is needed for classification models as supervised learning is being performed.
- Values: For regression models (e.g., predicting temperature, tire pressure). When discrete int or float values are used instead of categories. This is also supervised learning.
- Anomalies: For semi-supervised anomaly detection using only "normal" data samples to create a baseline model.
-
Select the segment list you created and click Start Exploring.
-
Once the training is complete:
- Review the generated models.
- Select the model with the best performance (we recommend using Spectral Magnitude as the feature space).
- Click Create Base Tool to save the model.
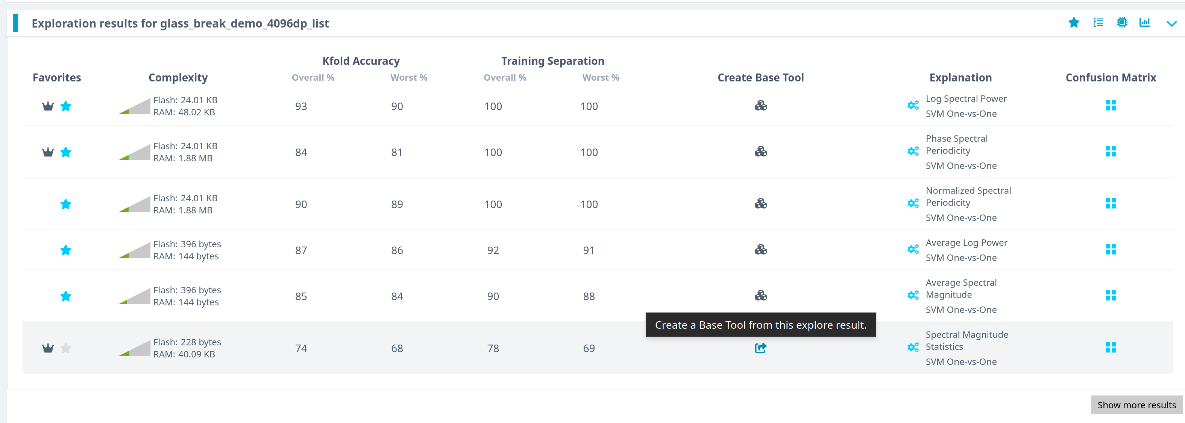
Hover over each model's explanation icon to view detailed insights.
What happens during AI Explore? Reality AI Tools automatically evaluates hundreds of feature sets and classification models using a subset of your data. The tool performs:
- Feature selection and dimensionality reduction
- Model training using supervised learning
- 10-fold cross-validation to estimate accuracy and resource usage
K-Fold Cross Validation Explained:
The dataset is divided intoKparts (K=10). Each fold is used once as a test set while the remaining are used for training. This repeatsKtimes to assess performance stability.
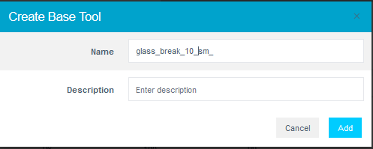
- Provide a name for the Base Tool or accept the default. Click Add to save.
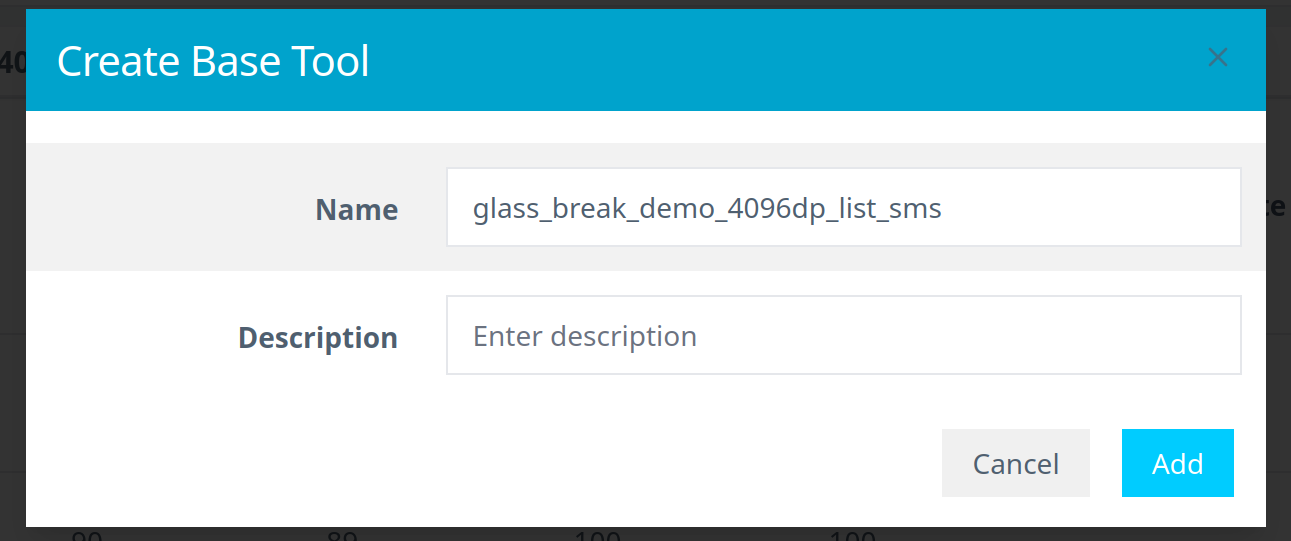
The tool icon will update to reflect successful creation.

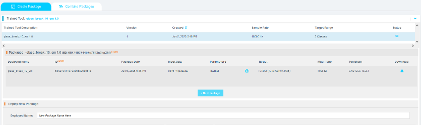
Package and Export the Trained Model
-
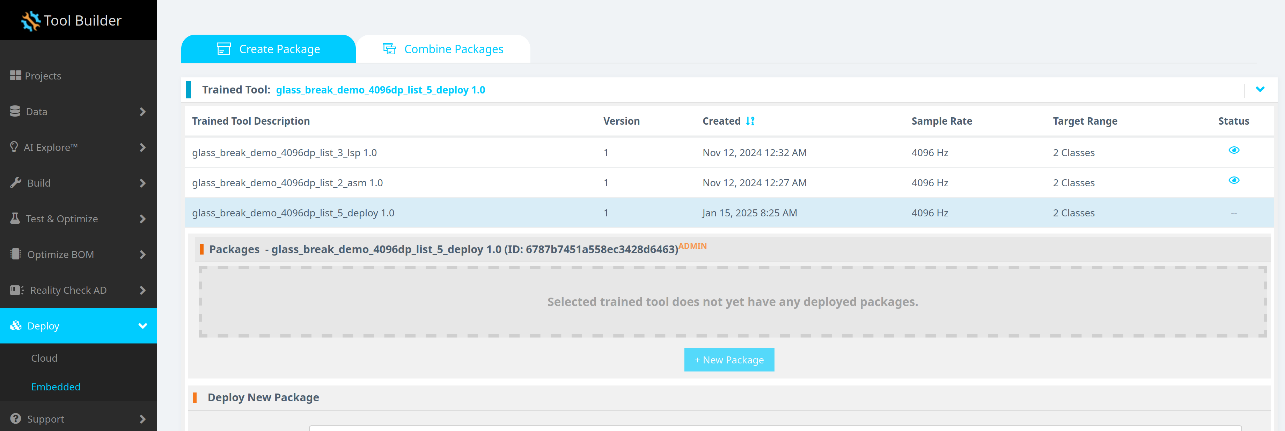
Navigate to Deploy > Embedded.
-
In the Trained Tool Description list, select your trained model.
-
Click + New Package.
-
Set the deployment options:
- Use a name like
glass_break_lsp_v2to match the function calls in the e² Studio project. - If you use a different name, update the code references accordingly.
- Use a name like
-
Click Generate Package.
The package generation process typically takes 10–15 minutes.
- Once ready, download the generated
.ziparchive.

Integrate the Model into e² Studio
-
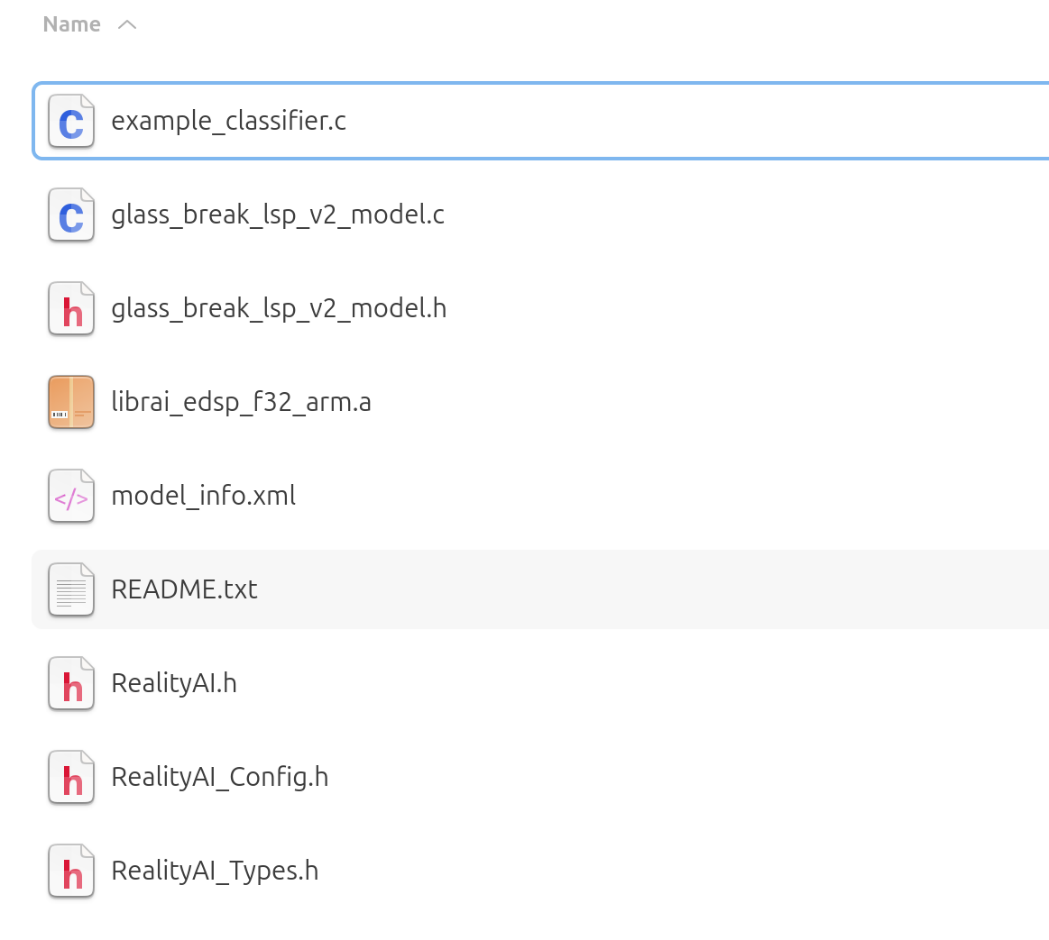
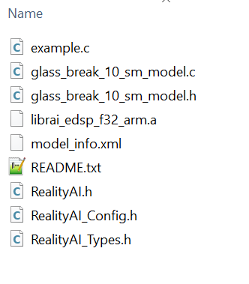
Extract the downloaded archive. It should contain nine files.
-
Copy all extracted files to the following path in your e² Studio project:
src > realityai
Important: Overwrite any existing files.
File names may vary based on the name given during model deployment.
- Confirm that the model function call is declared in
glass_break_lsp_v2_model.h.
You have now successfully trained, packaged, and integrated the AI model into your development environment.
Section 4: Deploying & testing the model
This section describes how to deploy the trained model onto the RA6E1 hardware board and test its real-time inference performance using live audio input. It also includes guidance for troubleshooting and validating model accuracy using built-in tools.
Configure the Model Header and Class Reference
-
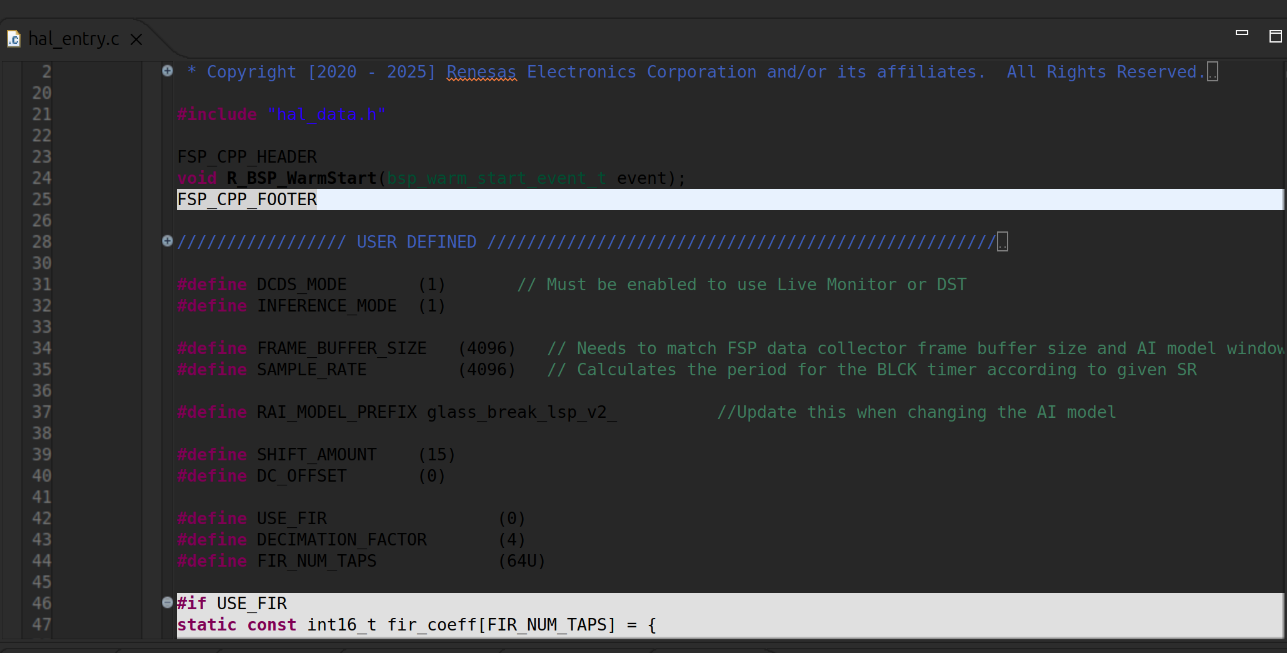
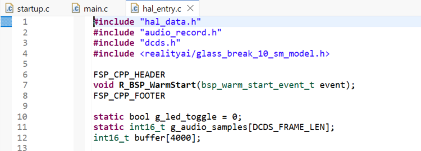
Open the
hal_entry.cfile in your e² Studio project. -
If you used the default deployment name (
glass_break_lsp_v2), no changes are needed. -
If a custom name was used, go to line 37 and replace the existing include path with the name of your generated model's header file.
-
Update the class reference in line 286 to match the name used during data recording (for example,
glass_break).

Build and Run the Inference Project
-
Build the project using the Hammer icon in the e² Studio toolbar.
-
After a successful build, start a debug session by clicking the Debug icon.
-
Once the program launches, click the Resume button twice to begin real-time model inference mode.
Monitor Live Inference Results
-
Disconnect the Reality AI Data Storage Tool if it is still active.
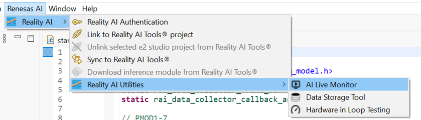
-
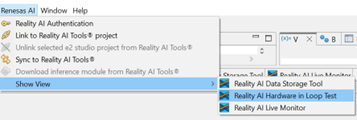
Navigate to Renesas AI > Show View > Reality AI Live Monitor.

-
Click the Data Connection button.
-
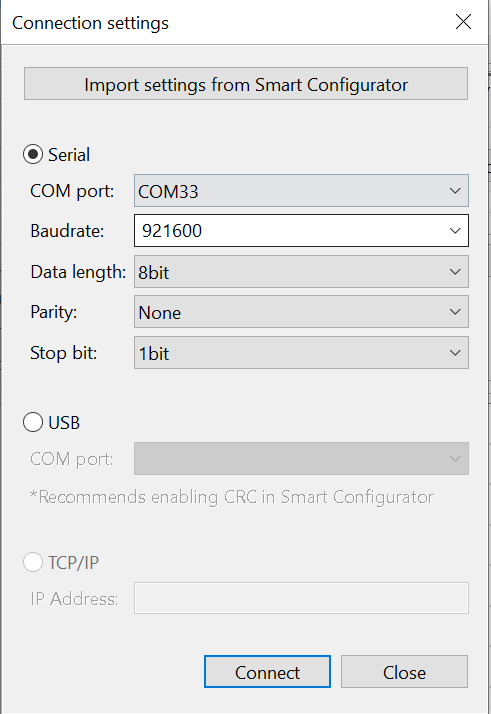
In the connection window:
- Select the appropriate COM Port.
- Set the Baud Rate to
921600. - Click Connect, then Close.
-
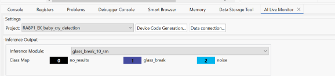
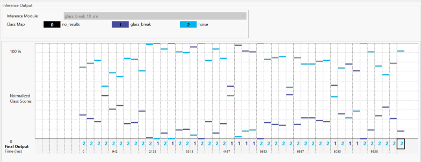
Once connected, you will see live model predictions on the chart.

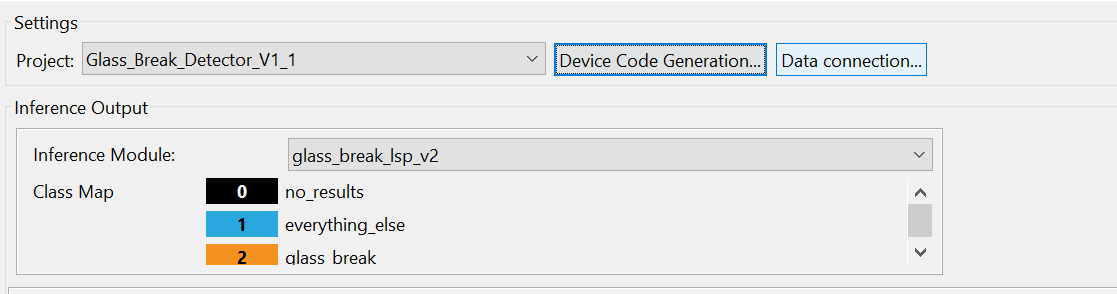
Interpretation:
- Class
1represents theeverything_elselabel.- Class
2represents theglass_breaklabel.- Higher orange bars on the Y-axis indicate a stronger prediction for that class.
- To test the model, play a few glass break audio clips (e.g., Sample dataset) near the microphone. Class
2should become dominant in the prediction chart.
Troubleshooting Tips
If the model does not perform as expected:
- Collect additional training data to improve model performance under diverse conditions.
- Ensure consistency between the data collection environment and the testing setup.
- Retrain the model with updated samples for better accuracy and generalization.
Validate the Model Using Hardware-In-Loop Testing
-
Navigate to Renesas AI > Hardware In-Loop Test.
-
In the Inference Package section:
- Select the deployed model from your Reality AI Tools account.
- If you are using the Explorer Tier, choose the
glass_break_lsp_v1model (a preloaded option).

-
Ensure that the hardware is connected and the correct COM Port is selected.
-
Click Start Test.
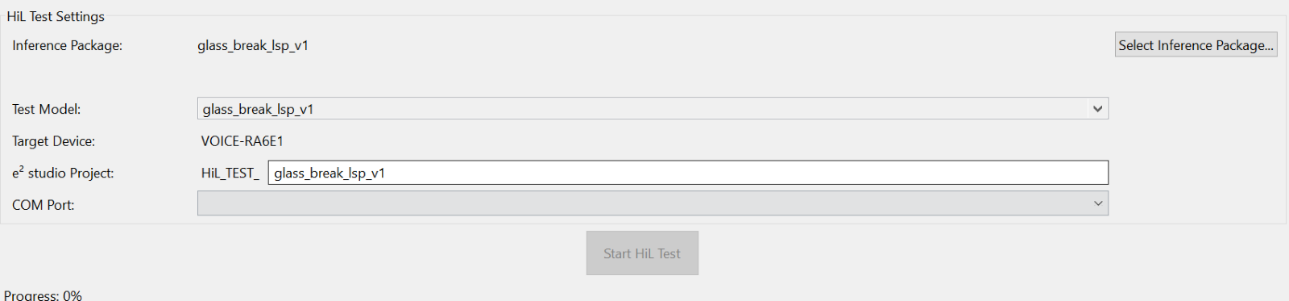
The plugin will:
- Generate a test project locally.
- Use a subset of training data (simulation data) to validate the model on actual hardware.
- After the test begins, you will see two key metrics displayed:
- Inference Time
- Overall Accuracy

You have now successfully deployed the trained AI model to hardware, verified its functionality using live input, and validated its performance using simulation data.
Section 5: Appendix
If Reality AI options do not appear in e² Studio:
- Go to Help > Install Renesas IDE Features….
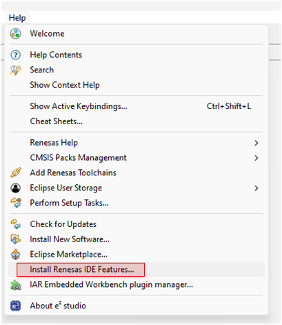
- Select Reality-AI features and click Finish.
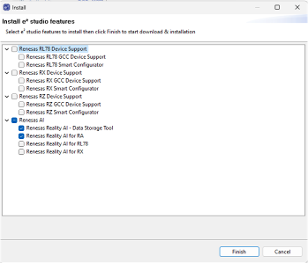
- Restart e² Studio when prompted.
Introduction - EK-RA8P1
This tutorial explains how to develop and test the Glass Break Detection demo using Renesas’s EK-RA8P1 kit and Reality AI Tools (Explorer Tier), a platform for building AI models for non-visual sensing applications.
Overview of the sections
| Section | Description |
|---|---|
| 1 | Prerequisites |
| 2 | Data Collection |
| 3 | Model Generation |
| 4 | Deploying & testing |
Follow the sections sequentially for best results.
Section 1: Prerequisites
This section outlines the hardware, software, and account requirements for running the Glass Break Detection demo.
Hardware Requirements
This tutorial requires the EK-RA8P1 kit.
The kit includes:
- EK-RA8P1 board
- USB cables for connecting to the USB Type-C debug port
Kit link: EK-RA8P1 - Evaluation Kit for RA8P1 MCU Group | Renesas
Software Requirements
Install the following:
- Renesas e² Studio IDE, version 2024-05 or newer
- Flexible Software Package (FSP) 6 or newer
Platform installer: FSP v6.2.0
Take note of your e² Studio installation directory.
You will also need the pre-configured e² Studio project for this lab, which contains all required settings and files. You can download the project here.
NOTE
This tutorial assumes you have e² Studio installed and can locate the installation directory before continuing.
Reality AI Tools Account
You will need an active account on the Reality AI Tools portal.
- Navigate to the login portal: https://portal.reality.ai/login
- Log in using your assigned username and password.
If you do not have credentials, contact Renesas AI COE Customer Success at rai-cs@dm.renesas.com
Leave the Reality AI Tools browser window open in the background while you work through this lab.
Section 2: Data Collection
This section describes how to use the Reality AI Eclipse plugin in e² Studio to collect labeled audio data for the Glass Break Detection demo.
Import the Project Into e² Studio
- Open e² Studio Launcher and click Browse to choose a workspace directory.
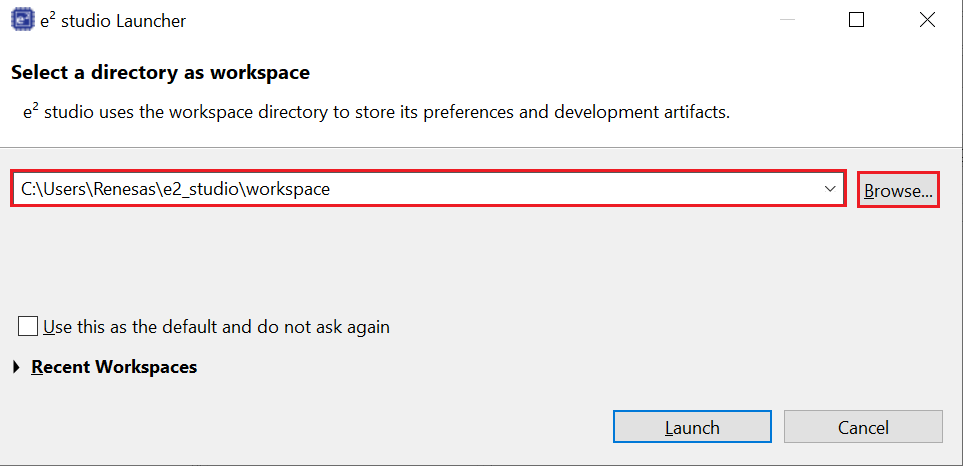
- Click Launch.
- Go to File > Import….
- Under General, select Existing Projects into Workspace and click Next.
- Click Select root directory, then Browse to locate the demo project folder.
- Click Finish to import the project.
Create a Project in Reality AI Tools
- Return to the Reality AI Tools portal.
- Click +Add Project.
- Enter a project name (e.g., Glass Break Demo) and optionally provide a description.
- Click +Add Project in the lower-right corner.
NOTE
Explorer Tier users may skip creating a project and instead use the existing Glass Break Detection project.
Generate and Apply an API Key
- In the Reality AI portal, click your username in the top-right corner and select API Key.
- Copy the key to your clipboard. This key will be used to authenticate e² Studio with Reality AI Tools.
- In e² Studio, go to Renesas AI > Reality AI Authentication. (If the Renesas AI menu is missing, refer to the appendix for troubleshooting.)
- Click Add, paste the API key, and select Apply and Close.
Once added, e² Studio is now connected to Reality AI Tools.
Configure the Data Storage Tool
- In e² Studio, go to Renesas AI > Reality AI > Reality AI Utilities > Reality AI Data Storage Tool.
- Drag the view into the main editor area if needed.
- Choose the project from the dropdown list and click Data Connection.
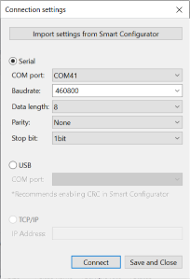
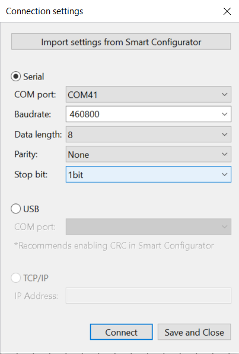
- In the dialog that appears:
- Choose the correct COM Port
- Set Baud Rate: to
460800 - Set communication parameters (Data length - Parity - Stop bit): 8-N-1
- Click Connect, then Close.
- Confirm that the status in the top left shows Receiving data... with a green check mark.
NOTE
A green checkmark and “Receiving data...” indicate the connection is successful — not that data capture is active.
Build and Run the Project
- Click the Hammer icon to build the project.
- Ensure the build completes without errors.
- Click the Debug icon to start a debug session.
- If prompted by Windows Defender, click Allow Access.
- If prompted to switch perspectives, check Remember my decision and click Switch.
- Click Resume twice — the program begins running.
Verify Live Signal
- Open the Reality AI Data Storage Tool.
- Check the Signal tab for waveform activity.
- If no waveform appears, switch to File Review, then back to Live View, and re-check connections.
Record Data
- In the Reality AI Data Storage Tool, enter a name in the Class Name field.
- Select the Unlimited checkbox to record variable-length data.
NOTE
There are two data collection modes:
- Unlimited — Recording continues until manually stopped.
- Number of frames per file — Automatically stops when the set frame count is reached.
For this tutorial, select Unlimited.
::: tip Setting the number of frames to 200 captures approximately 52 seconds of data. :::
- Enter the Class Name as
glass_break. - Play provided glass break audio clips via phone or PC speakers while the kit records.
- Once done, start a new recording session.
- Change the Class Name to
everything_elseornoise. Capture 2–3 minutes of ambient sound: talking, typing, silence, etc.The goal is to capture ambient noise for model contrast.
End Data Capture
- Click the Red Square icon to terminate the debug session.
- If the icon is not visible, switch to the Debug perspective.
The collected files should now appear in the list of recorded files, along with metadata.
Upload Data to Reality AI Tools
You can now upload the data to Reality AI Tools using Upload and run analysis on it.
- Select all recorded data files (use Ctrl + Click to select multiple files).
- Scroll the tool window to reveal the Upload… button.
- Click Upload….
- In the dialog:
- Choose the appropriate project (e.g., Glass Break Demo).
- Set Sampling Rate to
16000 Hz
- Click OK to upload the data.
After upload, a confirmation message will appear. The data and metadata.csv file will now be available in your Reality AI Tools project.
Section 3: Creating Models
This section explains how to prepare data, create segments, run AI Explore, and export a trained model.
NOTE
A Reality AI Tools Explorer Tier account is required. If you do not have access, contact the Renesas AI COE Customer Success team at rai-cs@dm.renesas.com.
Log In
- Open https://portal.reality.ai/login and sign in.
Format the Data
- Select the Glass Break Demo project to set it as the active project.
- On the left sidebar, click the Data tab.
- Click Curate.
- Expand Source Files and select all files.
- Click Action > Format Selected.

- In the formatting dialog:
- Expand the Data dropdown menu.
- Mark the first column as Ignore
- Set Sample Rate:
16000 Hz
- Click Confirm.
Segment the Data
- In the Curate view, click Action > Segment List from Selected.

NOTE
Why segmentation?
One of the primary goals of using Reality AI Tools is to generate models that can be deployed on various Renesas MCUs. These models are expected to operate in resource-constrained environments and must process live data efficiently. For practical real-time performance, the models are typically designed to analyze short time windows—such as 1 second, 500 milliseconds, or even less—rather than extended data streams lasting several seconds, minutes, or hours. To replicate these conditions during training, the raw data is segmented into shorter windows and fed into the model generation engine, enabling the model to learn patterns similar to those it will encounter in a live production environment.
- In the segmentation dialog, do the following:
- Set the Window Length to
4096 - Click the 50% button to select a 50% Offset.
- Enter a descriptive name for the segment list.
- Set the Window Length to
- Click Submit.
::: info NOTE
The estimated number of samples depends on your data volume. Your sample count may differ from the screenshots shown. :::
Terms:
- Window Length: Number of samples per analysis window.
- Offset: Overlap between consecutive windows.
- 50% overlap: Typical compromise between coverage and redundancy.
- Use non-overlapping segments for large datasets.
- Use all shifts (offset = 1) when simulating continuous stream testing.
Train a Model Using AI Explore
- Go to AI Explore > Classes in Reality AI portal.
- Select your segmented list and click Start Exploring.
Reality AI Tools evaluates hundreds of feature sets and ML models using 10-fold cross-validation.
- When the run completes, choose the best-performing model.
- Recommended: Spectral Magnitude feature space.

- Click Create Base Tool, provide a name or accept the default, then click Add.
The tool icon will update to reflect successful creation. Hover over each model's explanation icon to view detailed insights.

NOTE
What happens during AI Explore?
Reality AI Tools automatically evaluates hundreds of feature sets and classification models using a subset of your data. The tool performs:
- Feature selection and dimensionality reduction
- Model training using supervised learning
- 10-fold cross-validation to estimate accuracy and resource usage.
K-Fold Cross Validation Explained: The dataset is divided into K parts (K=10). Each fold is used once as a test set while the remaining are used for training. This repeats K times to assess performance stability.
Generate an Embedded Package
- Navigate to Deploy > Embedded.
- In the Trained Tool Description list, select your trained model.
- Click + New Package.
- Use a deployment name such as
glass_break_lsp_v2(this matches the default names in the e² Studio project). If you use a different name, update the code references accordingly.
- Click Generate Package.
Package generation typically takes 10–15 minutes.

- Download the ZIP file when ready (contains 9 files).
Integrate With e² Studio
- Extract the downloaded archive.
- Copy all files into:
src > realityaiwithin your e² Studio project. - Overwrite existing files if prompted.
Important: The model function call is referenced in
glass_break_10_sm_model.h(file name may change if you chose a different deployment name).
Section 4: Deploying & Testing the Model
This section explains how to deploy the model to hardware, run real-time inference, and validate predictions.
Update Header References
- Open
hal_entry.cfile in your e² Studio project. - If you used the default deployment name ('glass_break_lsp_v2'), no changes are needed.
- If your deployed model name differs from the project default, update the include lines accordingly (for example, edit line references where the header is included).
- Do the same in
dcds.c.

Build and Run
- Build the project using the Hammer icon in the e² Studio toolbar.
- After a successful build, start a debug session by clicking the Debug icon.
- Once the program launches, click the Resume button twice to begin real-time model inference mode.
Monitor Live Predictions
- Disconnect the Data Storage Tool.
- Go to Renesas AI > Reality AI Utilities > Reality AI Live Monitor.
- Click Data Connection.
- Set:
- Baud Rate:
921600 - Correct COM Port
- Baud Rate:
- Click Connect, then Close.
You will now see live class predictions:
- Class
1represents thenoise / everything_elselabel. - Class
2represents theglass_breaklabel. - Higher orange bars on the Y-axis indicate stronger predictions for that class.
- To test the model, play a few glass break audio clips (e.g., Sample dataset) near the microphone. Class
2should become dominant in the prediction chart.
If Model Performance Is Poor
- Collect more training data across varied conditions.
- Ensure test environment matches data collection environment.
- Retrain the model with the new samples.
Section 5: Appendix
If Reality AI options do not appear in e² Studio:
- Go to Help > Install Renesas IDE Features….
- Select Reality-AI features and click Finish.
- Restart e² Studio when prompted.