Source
Here, you can load or link all the source files containing data and training labels that you will use in Reality AI Tools. When you load a file, you must define the key parameters (like sample rate) to help Reality AI Tools understand your data. The input data can be in the form of CSV files or TXT files for raw sensor data and WAV files for audio data.
Upload Files
To upload data in Reality AI Tools, follow these steps:
- Navigate to the External Data tab.
- Choose an option from the Upload Type dropdown menu:
- Local Upload: Upload files from your local system.
- SFTP Upload: Import remote files using Secure FTP.
- URL Link: Provide URLs to upload files directly (supports individual files and Dropbox directories).
- Dropbox Login: Connect and upload files from Dropbox.
- S3 Bucket: Upload files from Amazon S3 by providing your AWS access and secret keys.
- Azure Storage: Link and upload files using your Azure credentials.
- Drag and drop one or more files directly into the designated panel.
Alternatively, click the panel to open a file browser for manual selection.
The maximum file size for upload is 300MB for Explorer tier and unlimited for other plans.

Upload Files via SFTP
In case you have huge volume of data, you can upload the files directly into the SFTP server.
- Download the free FileZilla software from FileZilla's official website.
- Install the application using the standard installation process.
- Open FileZilla and navigate to File > Site Manager > New Site.
- Enter the following details:
Field | Description |
|---|---|
Protocol | Select SFTP - SSH File Transfer Protocol from the dropdown. |
Port | Leave empty or enter 22. |
Host | Enter s-a22df1317cac4a8d9.server.transfer.us-east-1.amazonaws.com |
User | Enter your Reality AI Tools username. |
Password |
|
Once connected to the SFTP server, you will see a directory called SFTP_uploads.
The left panel represents your local computer directory.
The right panel represents the remote server directory.
- To upload files, select the required files from the left panel.
- Right-click and select Upload. The files will appear in the active directory on the right panel.
- To download files, select the required files from the remote directory (right panel).
- Right-click and select Download.
Import Files into Reality AI Tools
- Go to Reality AI Tools > Data > Source > External Data.
- From the dropdown menu, select SFTP.
- All files uploaded to the SFTP server will appear here.
- Select the files you want and click Import Files.
The files will be mapped from the SFTP directory to the Reality AI Tools directory.
e2 Studio Data
To capture data directly from sensors, select e2 Studio Data
This is an IDE released by Renesas.
Here, you can view the following information:
| Parameter | Description |
|---|---|
| File Name | The name of the uploaded file, used to identify the data. |
| Project | The specific project to which the file is associated. |
| Type | The format of the file (e.g., CSV, JSON) or its data type. |
| Size | The file size, typically measured in kilobytes (KB), megabytes (MB), or gigabytes (GB). |
| Collection Date | The date when the data was collected, providing a timeline for data relevance. |
| Data Shape | The structure or format of the data, such as the number of rows and columns in a tabular dataset. |
| Sample Rate | The frequency at which data samples were collected, usually measured in Hertz (Hz). |
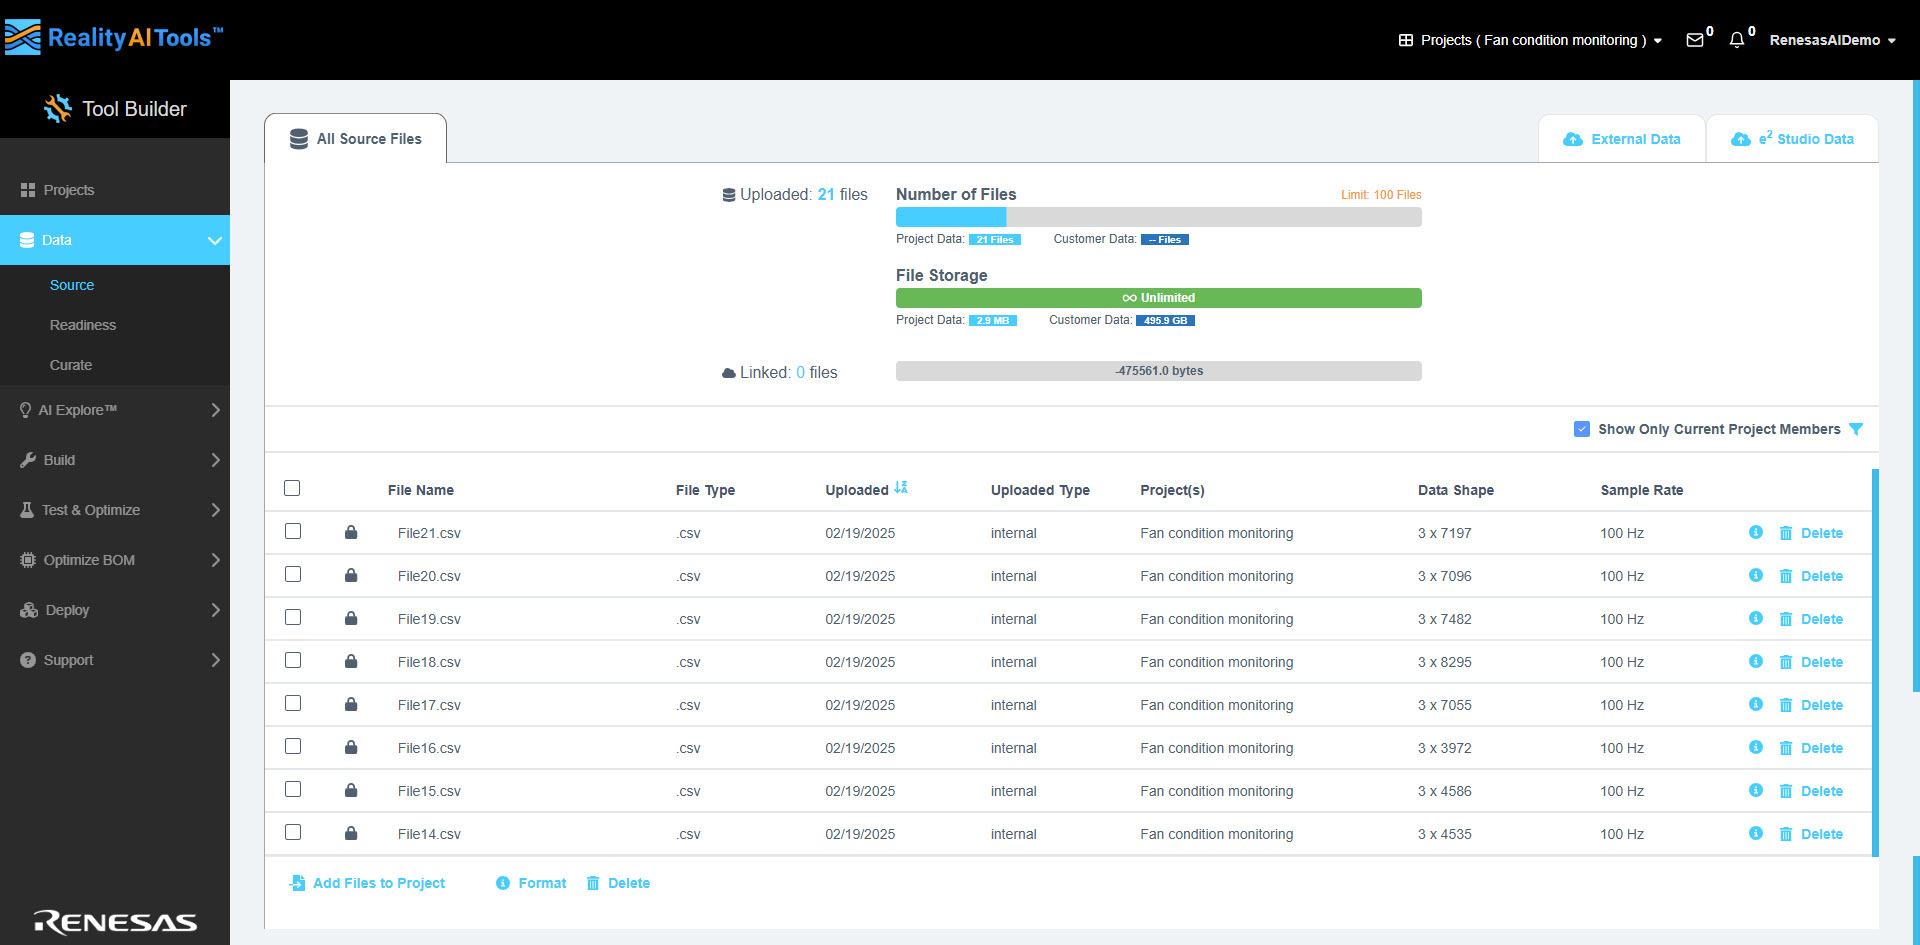
All Source Files
The All Source Files tab displays information regarding the uploaded data in Reality AI Tools.
- From the left navigation pane, go to Data > Source.
The All Source Files section displays detailed information about your uploaded data:
| Field | Description |
|---|---|
| Uploaded | Shows the total number of uploaded files. |
| Number of Files | Shows the Project Data, Customer Data and the Maximum Upload Limit. The maximum upload limit is up to 7000 files for Explorer tier and unlimited for other plans. |
| File Storage | Shows the size of Project Data, Customer Data and the default storage is 300MB for Explorer tier and unlimited for other plans. |
| Linked | Total number of files linked to the current project. |
A status bar shows storage utilization for linked files.
- In the All Source Files tab, select the Show Only Project Members checkbox to filter files to display only those uploaded by project members.
- Use the Filter.
The table provides information regarding the source files such as:
| Field | Description |
|---|---|
| File Name | The name of the source file, which helps identify the data uploaded. |
| File Type | The format of the file (e.g., CSV). |
| Uploaded | The date when the file was uploaded to the system. |
| Uploaded Type | The method used to upload the file (e.g., Local, S3, Dropbox etc.). |
| Project(s) | The project or projects associated with the uploaded file. |
| Data Shape | Describes the structure of the data, such as rows and columns in a tabular format. |
| Sample Rate | Indicates the frequency at which data points were collected, typically measured in Hertz (Hz). |
| i | Click the info icon (i) to view or modify the file specifics. |
| Delete | Use the delete icon to remove files that are no longer needed. |
Additional Options
Located below the file table:
- Add Files to Project: Add selected files to your project.
- Format: Prepare files for analysis.
- Delete: Remove multiple files at once.
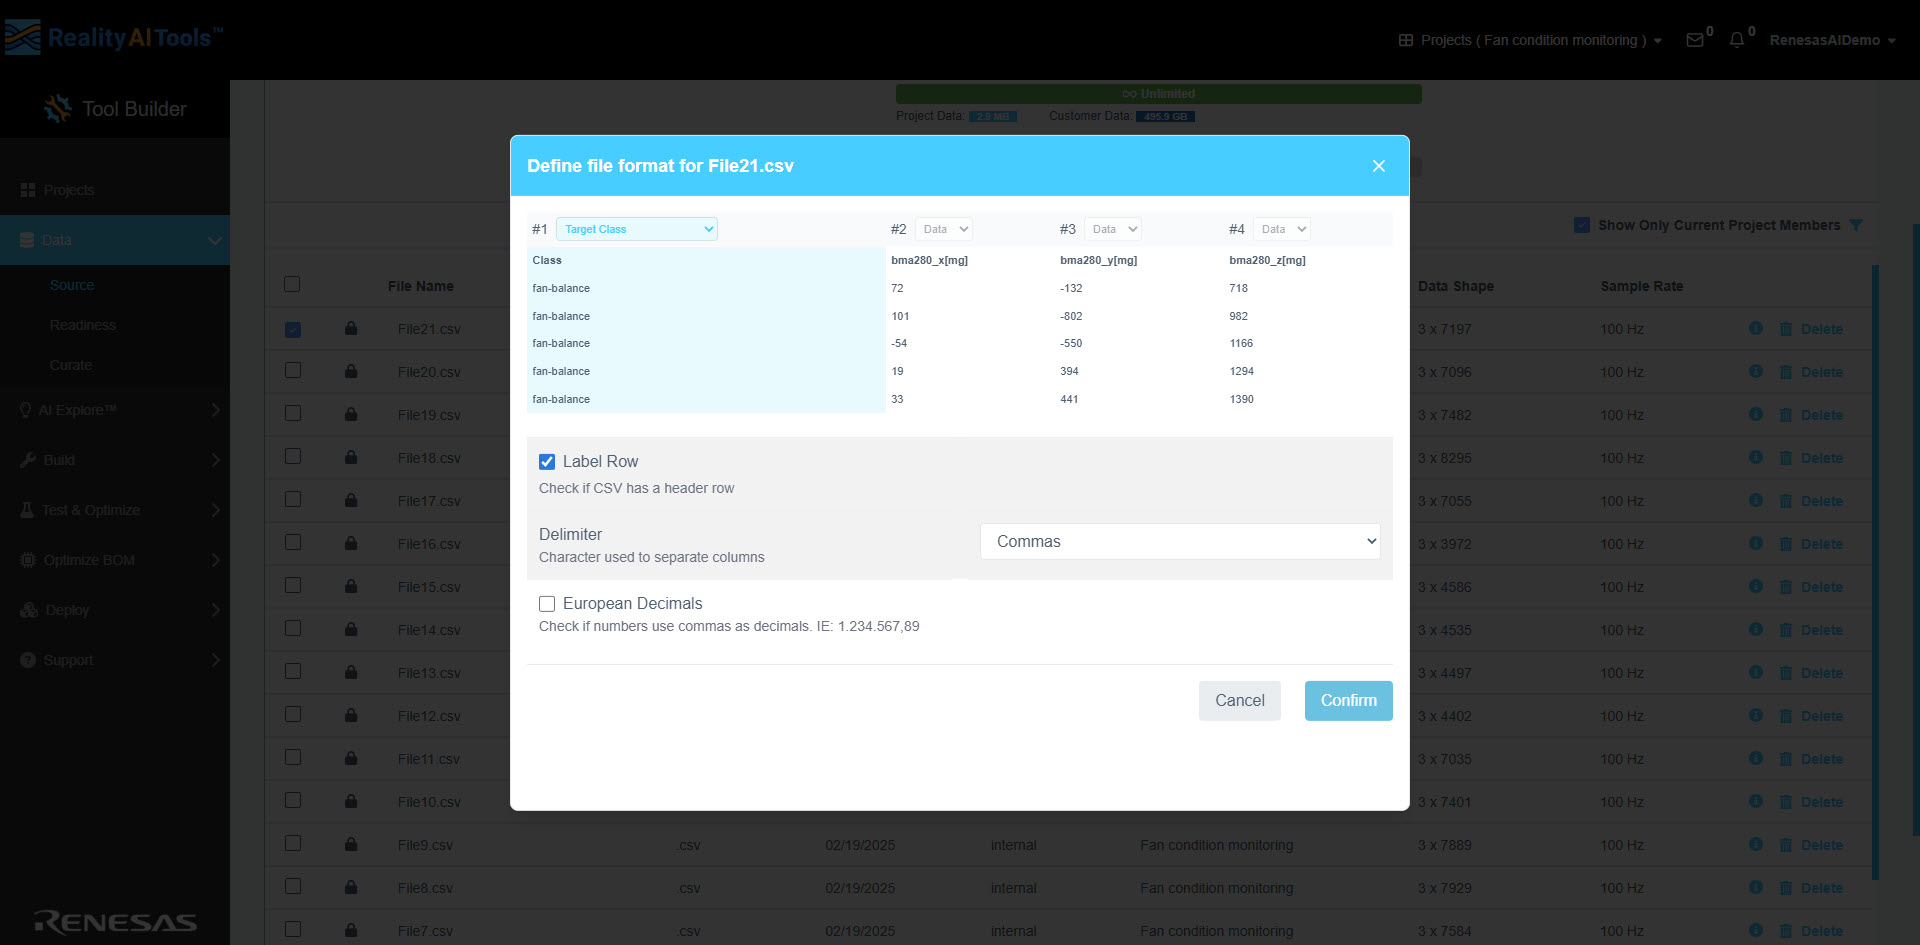
Define File Format
Once the data is uploaded, the Define file format window automatically opens. Alternatively, you can click the i icon next to the uploaded file to open this window. You can perform the following operations here:
- Display Raw Data: Select the checkbox to view the unprocessed data.
- Display Issues Only: Choose this option to filter and view only problematic data.
Select the dropdown in any of the columns to assign the following fields, as required:
| Option | Description |
|---|---|
| Data | Represents the raw sensor data collected. |
| Target Class | Labels used for classification tasks in Machine Learning. This is typically categorical data, such as the state of a fan (e.g., Fan-On, Fan-Off) or the status of a machine (e.g., Normal vs. Abnormal). |
| Target Value | Labels representing numerical values, either integer or floating-point, typically used for regression tasks. |
| Categorical Metadata | Represents additional categorical information related to the data. |
| Numerical Metadata | Represents additional numerical information, such as serial number, measurements, or sensor IDs. |
| Sequential #s/Time Code | Sequential identifiers or time codes that can be useful for temporal analysis. |
| Date and Time | Timestamp representing both the date and time the data was collected. |
| Date Only | Represents only the date portion of the timestamp. |
| Time Only | Represents only the time portion of the timestamp. |
| Ignore | Marks data to be excluded from analysis. |
The tool primarily uses three types of data from the list:
- Target Class or Target Value for labeling - Labels represent numerical values, either integers or floating-point, and are used for regression tasks to analyze and predict continuous outcomes. The tool focuses on two key options for labeling: Target Class or Target Value for defining outputs and Data for raw sensor inputs. Other fields, such as time, date, or numeric metadata, are included for sorting results but do not impact the model training or generation process.
- Data to signify raw sensor data.
Selecting the Target Class is essential for data processing and classification. Other fields like time, date, and metadata (categorical or numerical) are primarily for sorting and organization. These do not affect the model training or generation process but can be helpful for filtering and analyzing the data during preprocessing.
- Label Row: Select the checkbox if the selected CSV file has a header row. Selecting this checkbox will exclude the header row during data processing.
- Sample Rate: Enter the sampling frequency in Hz for the sensors from which the data was collected. This is a mandatory field.
Ensure that all sensor data share the same sampling rate when multiple sensors are used.
- Delimiter: Choose the character that separates columns in the uploaded file (e.g., Comma, Semicolon, Space, or Tab) from the dropdown menu.
- European Decimals: Select the checkbox if the numbers in your data use commas as decimals (e.g., 1.234.567,89).
- Apply for all: Select this checkbox to apply the same settings to all files uploaded, making it easier for bulk formatting. This option is available only when multiple files are selected.
- Save New Preset: Save the current settings as a preset for future use.
- Confirm: Click this to apply the settings to all the files.
Managing Uploaded Files
You can perform the following functions on the uploaded files:
- Select one or more checkboxes next to the uploaded files to activate the action buttons: Add Files to Project, Format, and Delete.
- Click Add Files to Project to include the selected files in other projects.
- Use the Format button to open the Define File Format window and configure file settings.
- Click the Delete button to remove the selected files from the list.
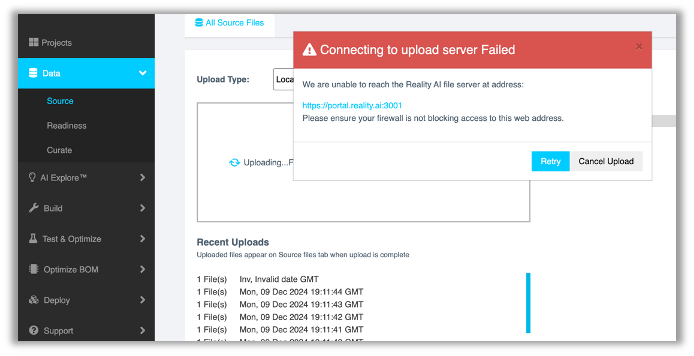
Troubleshooting
Error message: Connecting to upload server Failed
We are unable to reach the Reality AI file server at address:
https://portal.reality.ai:3001
Please ensure your firewall is not blocking access to this web address.
Solution 1: Check your internet connection.
Solution 2: Check your user permissions.