Car state detection
Introduction
This tutorial introduces you to the Car State Detection AI demo using the Renesas AIK-RA6M3 Solution Kit. The tutorial uses non-visual sensor data to classify different car movement states. You’ll learn how to assemble the hardware, configure the development environment, and access the Reality AI Tools portal to work with pre-provided models and datasets.
This section provides the foundation required to complete the tutorial successfully. Ensure all hardware is assembled correctly and software prerequisites are installed before proceeding.
Objectives
By the end of this section, you will be able to:
- Identify the required hardware and assemble the AIK-RA6M3 kit.
- Install and verify the correct version of the Renesas development environment.
- Access and log in to the Reality AI Tools portal.
Prerequisites
Hardware
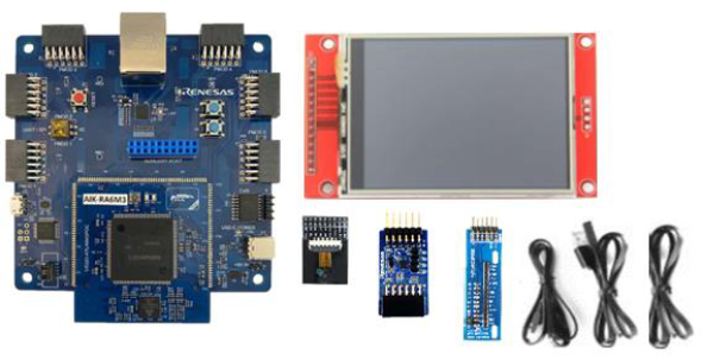
- Renesas AIK-RA6M3 Solution Kit, including:
- AIK-RA6M3 board
- OV2640 camera module
- Renesas ICM-42670-P PMOD accelerometer board
- Display
- Ethernet patch cable
- Micro USB device cable (Type-A to Micro-B)
- USB device cable (Type-A to Type-C)
- Windows PC (Windows 10 or 11)
Software
- E²-Studio IDE version 2025-04 or later
- Flexible Software Package (FSP) version 5.5.0 or later
- Reality AI Tools portal account
Dataset
- Pre-recorded data files and project templates provided by the Renesas Reality AI team
(Sample dataset)
Estimated Completion Time
30 minutes
Step-by-Step Instructions
Step 1: Verify kit components
Step 1.1: Review Kit Components
Ensure the following components are present:
- AIK-RA6M3 board
- PMOD accelerometer (Renesas ICM-42670-P)
- OV2640 camera module
- Display unit
- Required cables (Micro-USB and USB Type-C)
Step 1.2: Assemble the Kit
- Connect the PMOD accelerometer to the PMOD1 port on the AIK-RA6M3 board.
- Set the S4 DIP switch on the board to IIC mode.
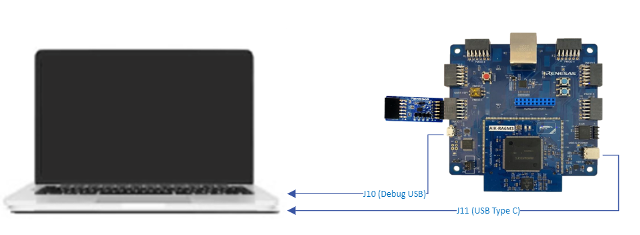
- Connect your PC to the board’s Micro-USB port using the appropriate cable.
- Connect the USB Type-C port on the board to your PC.
Ensure the device is recognized by your PC after connection.
Step 1.3: Install the Renesas Development Environment
- Download and install E²-Studio IDE v2025-04 or newer from the Renesas website.
Download E²-Studio for Windows – Latest Version - Ensure FSP version 5.5.0 or newer is installed.
- Take note of the installation path—it will be needed in later steps.
This tutorial assumes FSP version 5.5.0. If you use a newer version, consult the release notes and adjust the steps accordingly.
Step 1.4: Access Reality AI Tools Portal
- Navigate to the Reality AI Tools login page.
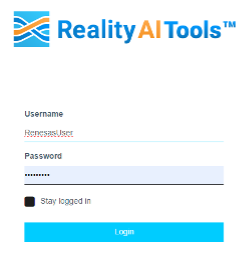
-
Use the credentials provided by the Renesas AI CS team.
If you don’t have login details, contact rai-cs@dm.renesas.com.
-
Keep the portal open in your browser for later use.
Step 2: Configure and Capture Sensor Data
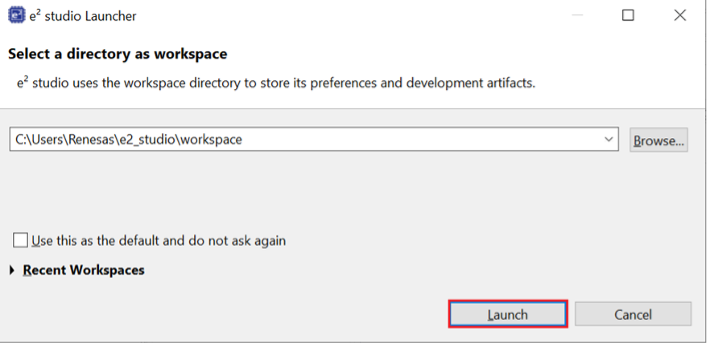
Step 2.1: Launch e² Studio and Select Workspace
- Open e² Studio IDE.
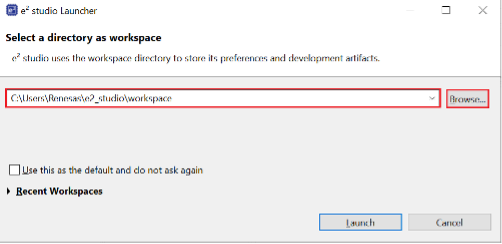
- Choose your desired workspace directory and click Launch.
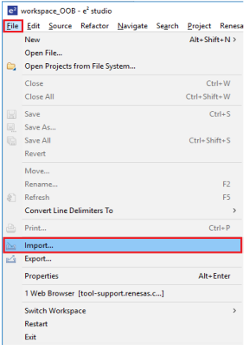
Step 2.2: Import the Car State Project
- Go to File > Import....
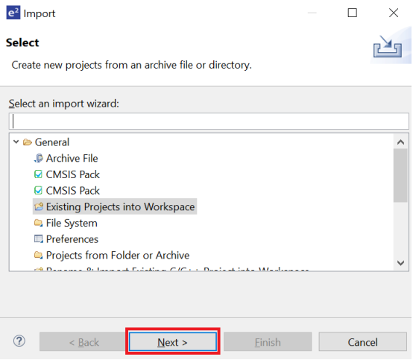
- Navigate to General > Existing Projects into Workspace and click Next.
- Select Select root directory, then click Browse and locate the example project folder.
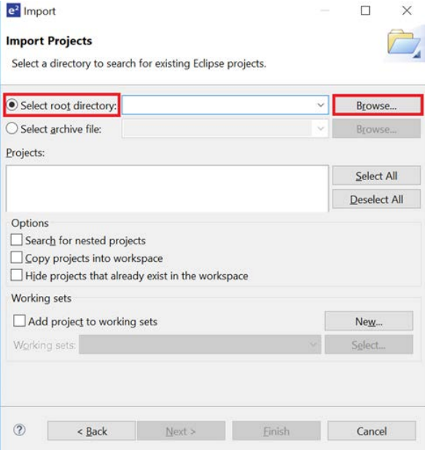
Click Finish to import the demo project.
Step 2.3: Create or Select Reality AI Project
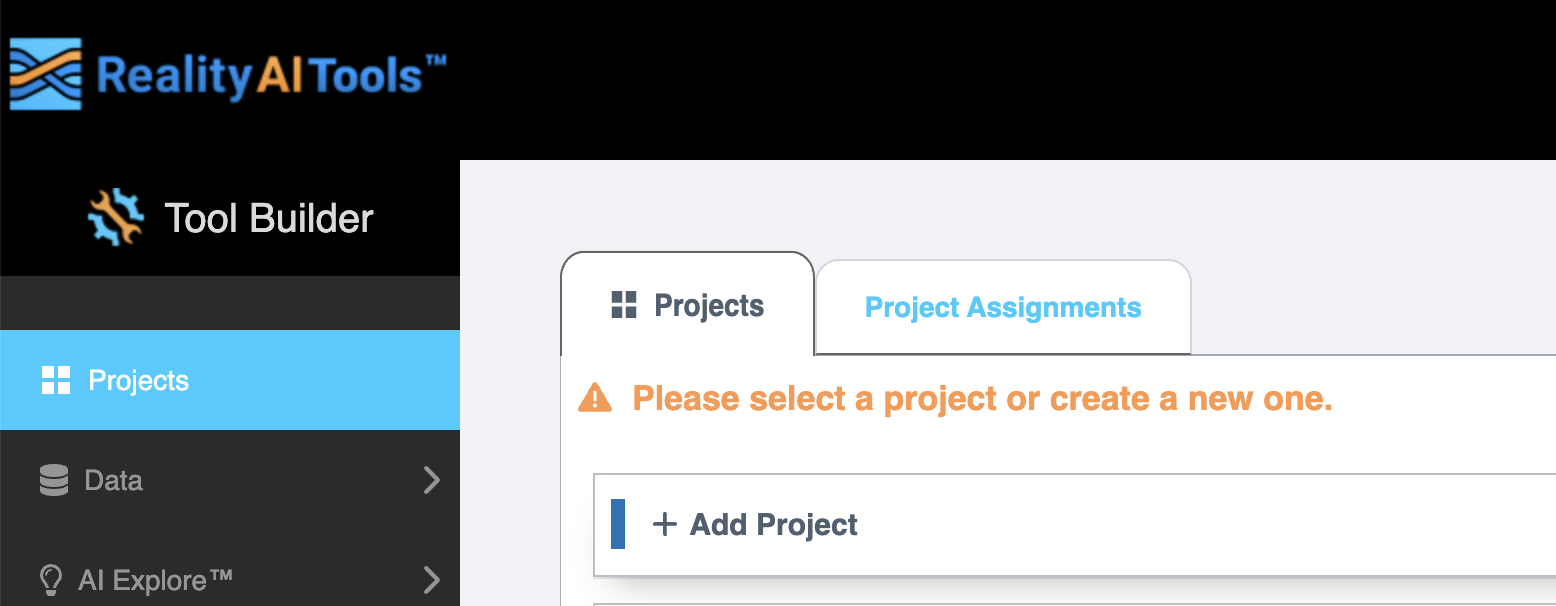
- In your browser, open Reality AI Tools.
- Click + Add Project, provide a name and optional description, then click the bottom +Add Project button.

If you're using an Explorer Tier subscription, reuse the existing Car State Detection project.
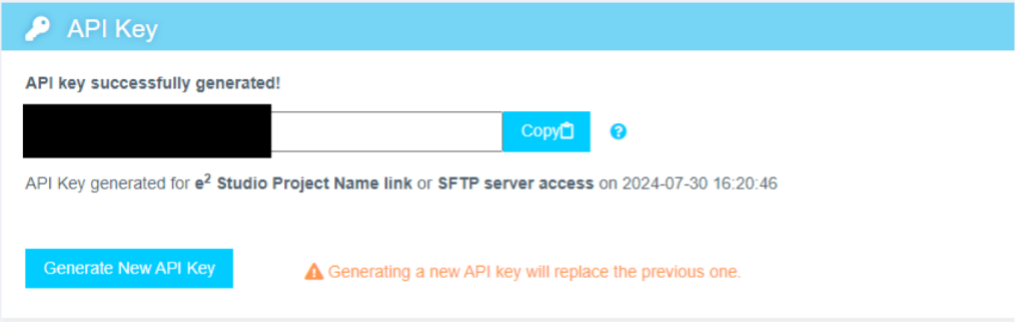
Step 2.4: Copy Your API Key
- In the Reality AI portal, click your username in the top-right corner.
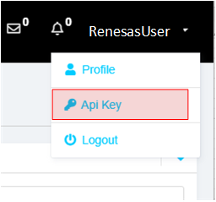
- Select API Key and copy it to your clipboard.
Step 2.5: Authenticate Reality AI Plugin in e² Studio
- In e² Studio, go to Renesas AI > Reality AI Authentication.
- (If this menu is missing, see the Appendix for troubleshooting.)
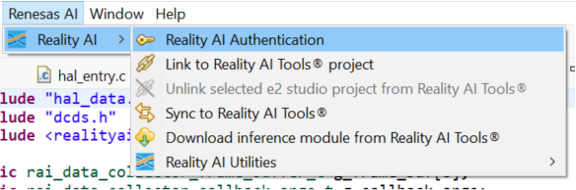
- Click Add, paste your API key, then click Apply and Close.


Your IDE is now connected to the Reality AI portal.
Step 2.6: Open the Reality AI Data Storage Tool
- Go to Renesas AI > Show View > Reality AI Data Storage Tool.
- A new window will appear in the bottom pane.
- Drag and drop this view into the main view tab area for better visibility.
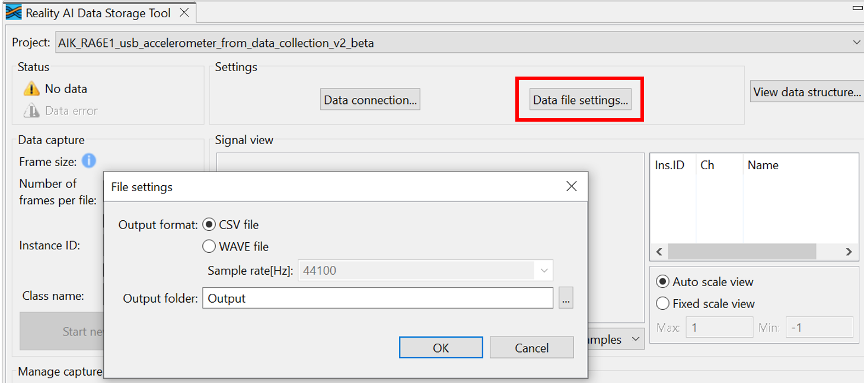
Step 2.7: Configure Data File Settings
- In the Data Storage Tool, click Data file settings.
- Confirm:
- Output format:
.csv - Output folder location (relative to project)
- Output format:
- Click OK.
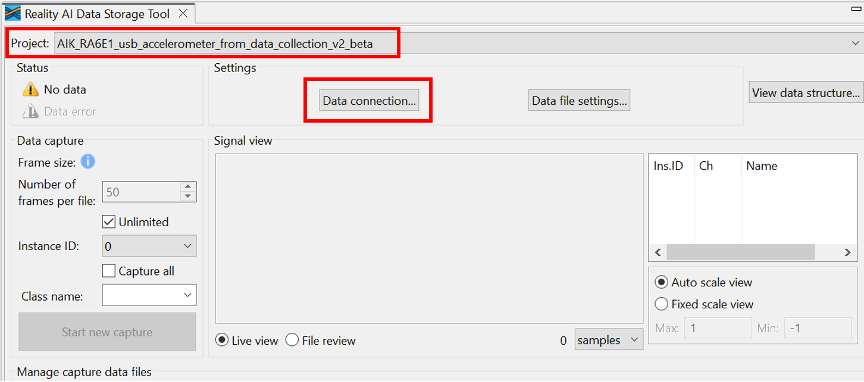
Select your project in the dropdown menu, then click Data Connection.
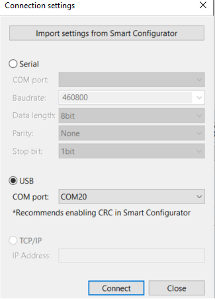
Step 2.8: Connect to the USB COM Port
- In the Connection Settings window:
- Select USB as the connection type.
- Choose the appropriate COM Port.
- Click Connect, then Close.
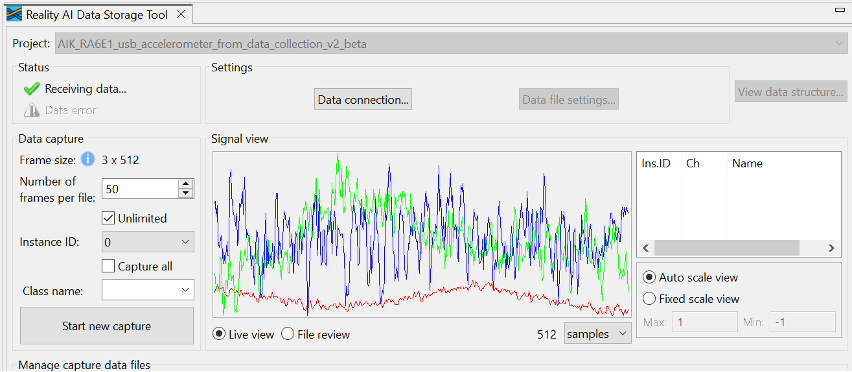
Step 2.9: Verify Signal in Live View
- Go to the Reality AI Data Storage Tool view.
- Look for waveform in the Signal View pane.
- If not visible, toggle between File Review and Live View.
- You should see:
- Green checkmark
- "Receiving data..." message
- Live waveform stream
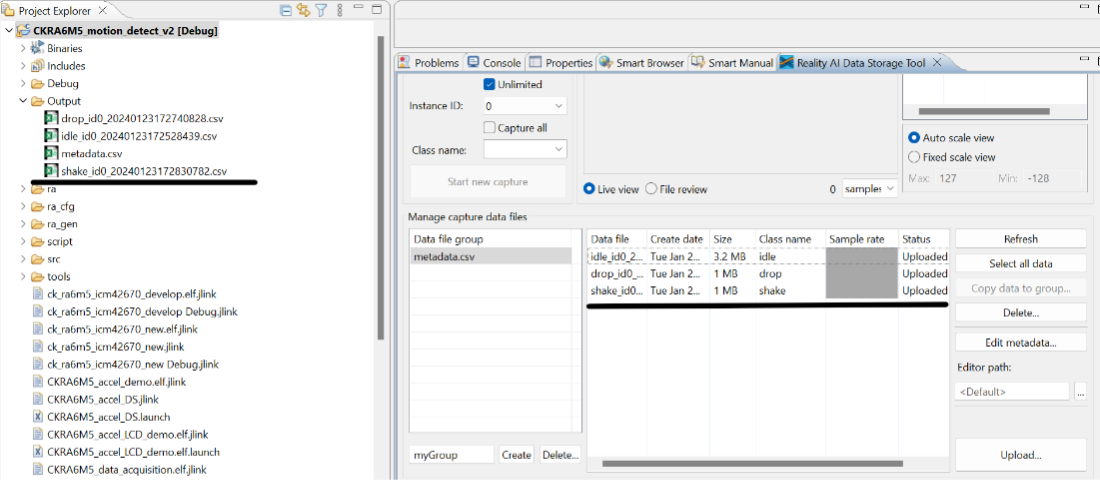
- Note that the Data Storage tool reflects the data in the project’s Output folder. The preexisting data currently there was collected during the tutorial development and includes date and time information. New data will be collected in the following sections to supplement this.
Step 2.10: Understand Storage Modes
There are two data capture modes:
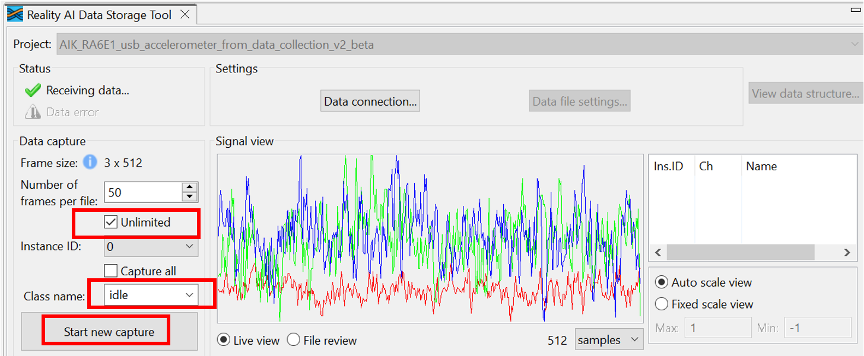
- Unlimited: Captures data continuously until manually stopped.
- Number of frames per file: Captures a fixed number of frames (e.g., 200 = ~52 seconds).
This tutorial uses Unlimited mode for all recordings.
Step 2.11: Collect "Idle" Class Data
- In the Data Storage Tool:
- Check the Unlimited checkbox.
- Enter idle as the class name.
- Click Start New Capture.
- Leave the board stationary for ~60 seconds.
- Click Stop Capture.
A new file labeled "idle" should appear in the capture data file table.
Step 2.12: Collect "Drop" Class Data
- Enter drop as the class name.
- Click Start New Capture.
- Gently drop the board from ~7 cm height onto a padded surface (avoid direct PMOD impact).
- Repeat for 1–2 minutes.
- Click Stop Capture.
You should now have a "drop" data file in the file table.

Step 2.13: Collect "Motion" Class Data
- Enter motion as the class name.
- Click Start New Capture.
- Slide, rotate, and move the board in the air for ~60 seconds.
- Click Stop Capture.
You should now see all three labeled files: idle, drop, motion.
Step 2.14: Supplemental Data
If you copied the pre-provided Output folder:
- Supplemental data with timestamped filenames should already exist.
- If not, manually merge
metadata.csvfiles from your captures with the provided one.
Step 2.15: Upload Captured Data to Reality AI
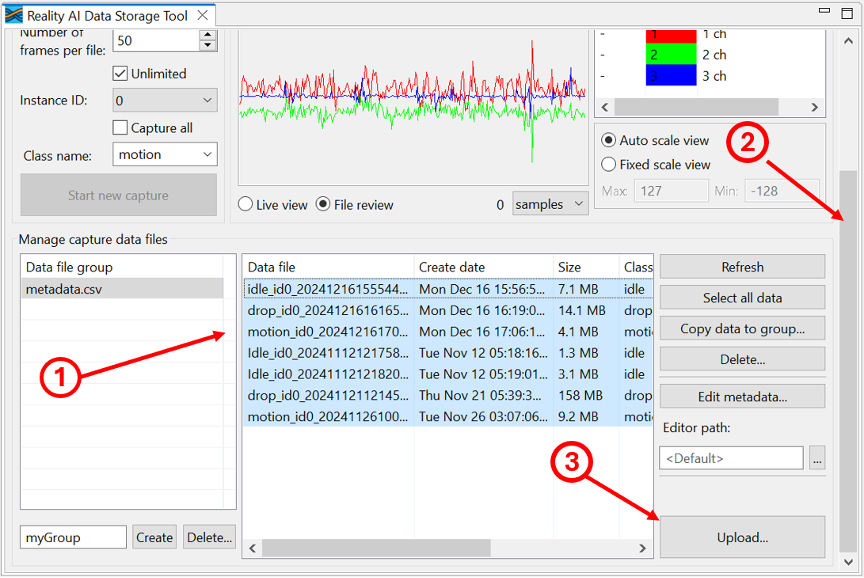
- In the Data Storage Tool, use Control + Click to select all relevant files.
- Include supplemental files if available.
- Scroll down in the view until you find the Upload button (bottom right).
- Click Upload.
Step 2.16: Finalize Upload in Reality AI Portal
- A dialog box will appear with available projects.
- Select your project.
- Set Sampling rate to 1600.
- Click OK.
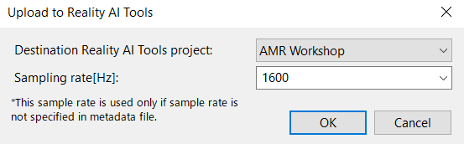
You’ll receive a confirmation once the data and metadata are successfully uploaded.
Step 3: Create the Model
This section explains how to create AI models using the data collected in the previous steps. You will use the Reality AI Tools platform to curate, format, preprocess, and train a model that can classify different states of movement using the collected accelerometer data.
A Reality AI Tools account is required for this section. If you do not have credentials, contact the Renesas Reality AI team at rai-cs@dm.renesas.com.
- Version 5.6.6
- Version 6.0
Step 3.1: Log in to Reality AI Tools
Open https://portal.reality.ai/login in your browser and enter the provided credentials.
Step 3.2: Format the Data
- Click your Asset Movement project to make it active. The project tab will expand, and the Project indicator on the top ribbon will update.

- In the left navigation panel, click Data to expand the section.
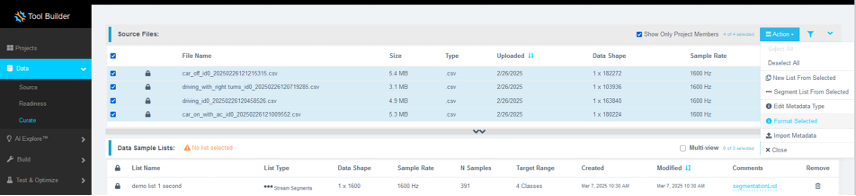
- Select Curate.
- Click Source Files to expand the list.
- Select all files by clicking the checkbox next to File Name.
- Click Action, then select Format Selected to open the formatting dialog.
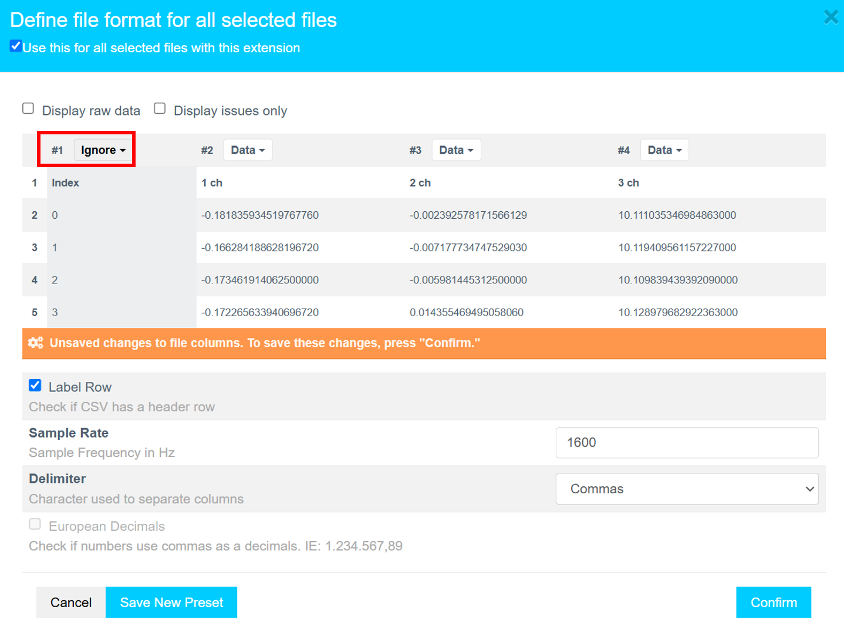
- In the dialog:
- Click the first column dropdown (default shows Data).
- Scroll down and select Ignore to exclude the column of index values.
- Click Confirm to apply the formatting.
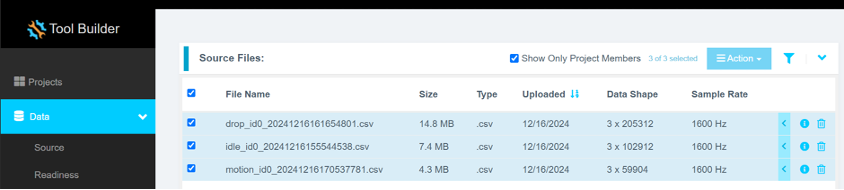
Step 3.3: Verify Data Format
Ensure that the data shape is 3 × n, where n is the number of samples, and that the Sample Rate is set to 1600 Hz.
Step 3.4: Segment the Data
Select all formatted files and go to Action > Segment List From Selected.

Why Segmentation?
Segmenting data enables models to make predictions using short windows of real-time sensor input. This is essential for deploying models on resource-constrained Renesas MCUs. Each segment acts as a training sample, making model inference faster and more efficient.
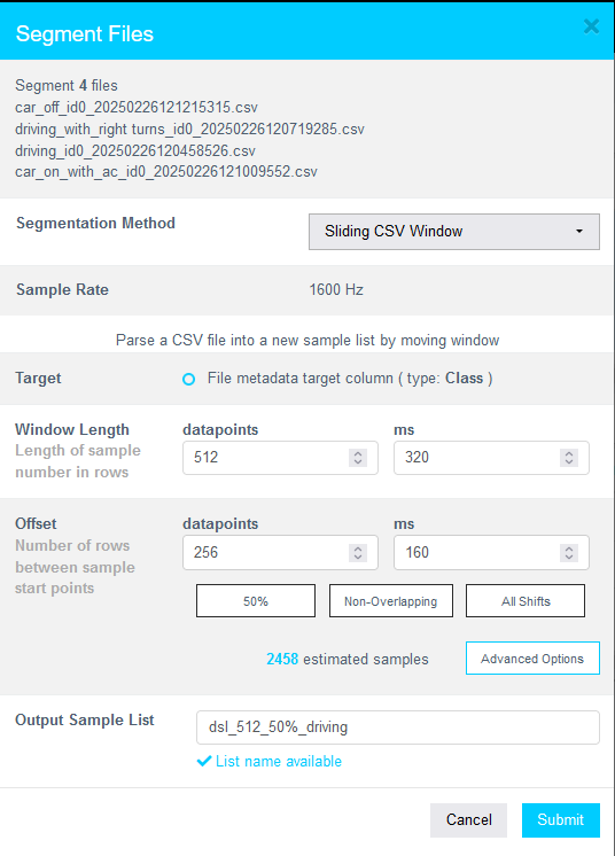
Step 3.5: Set Segmentation Parameters
For both idle and motion data, do the following:
- Set Window Length to
512datapoints. - For Offset, click Non-Overlapping. This will automatically calculate the offset datapoints.
- Provide a meaningful name to the new segment list in the Output Sample List field.
- Click Submit.
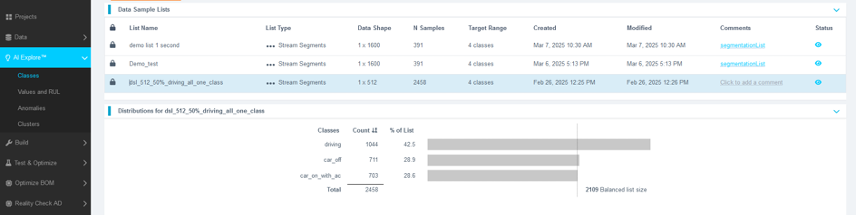
You should see the new sample list appear under Data Sample Lists. Refresh the page if it doesn't show immediately.
Overview
In this section, we will:
- Inference Target assign inference target.
- Create Dataset organize the files into a dataset.
- Break down data files into smaller segments.
- Prepare the dataset for Machine Learning (ML) model training.
🔹 Why segmentation?
- Machine Learning models process small, time-based segments for predictions.
- If a data file is 10 seconds long, we can split it into 1-second segments (10 total).
- This helps the model analyze and classify real-time data efficiently.
For this tutorial, we will use a 1-second window length.
Step 3.1: Access the Curate Section and Project Files
- Select all files and click on the blue Metadata line on the right.
- Click on the downward arrow and select Target Class. This will select the Class column as the Inference Target. This utility is especially needed if you have multiple classes in the dataset and want to switch between classes when analyzing the dataset.
- You will see that the Inference Target section now says Target Class
- Select All Files
- Click on Create New Dataset. This action will organize the files into a list/ data set. This feature is especially helpful if you have huge amount of data (> 500 files). Organizing files across, days, months, metadata types, etc is valuable.
- Once a menu pops open, give the data set a name and click Create.
Step 3.2: Select Data sets for Segmentation and Configure Parameters
- Click on Data Sets option at the top and further select the Data set we just created
- Once you have expanded the data set, we will create a sample list. Sample list is just a collection of blocks/ pieces/ buffers of data files. We will use 1 second as window/ buffer/ block length for this tutorial. Navigate to the bottom and click on Create Sample List.
- You can create a single list or use random splits to divide the files into train,test,...and more. For simplicity, we will just go with single list.
- Assign the Window Length as 1 second and select Non-Overlapping as option for the windows/ blocks of data. Click Submit after.
- Window Length:
512datapoints,320ms - Offset:
256datapoints,160ms (non-overlapping segments) - Segment Name: Enter a meaningful name
Why segment data?
- Real-time ML models deployed on Renesas MCUs must process live data efficiently.
- Shorter time windows allow quick predictions.
- Breaking down raw training data mimics real-world, real-time conditions.
Additional Information:
- Window Length: Defines how much data is considered in one classification.
- Offset: Controls how far the parser moves before creating a new segment.
50% overlap(offset = half of window length) is a good balance.Offset = 1(all shifts) is useful for final testing to simulate real-world performance.No overlapis better when data is abundant.
Step 3.4: Verify Segmentation and View Segmented Data
- Navigate to Samples List tab.
- Wait for ~30 seconds (varies based on dataset size).
- Refresh the page if needed and navigate to the tab.
- Click on the finished list and expand to see the histogram.
- Segmenting this dataset takes less than 1 min.
- Larger files (e.g., 1 GB) may take 5-10 minutes.
You have successfully:
- Segmented the dataset into 1-second blocks
- Created structured input for the ML model
Model Types in Reality AI Tools
Reality AI supports three types of models:
- Classes – Classifies labeled categorical data (used in this tutorial).
- Values – Predicts continuous outputs (e.g., temperature, tire pressure).
- Anomalies – Detects outliers in data using a semi-supervised learning approach.
Step 3.6: Start Model Training with AI Explore
- Navigate to AI Explore > Classes.
- Click the newly created sample list.
- Click Start Exploring.
What Happens During Exploration
- AI Explore creates a balanced subset of your data and may sub-sample it to reduce processing time.
- It then tests hundreds of feature sets and machine learning models.
- Models are validated using K-Fold Cross Validation (K=10):
- The dataset is split into 10 parts.
- Each fold is used once as a test set while the remaining folds are used for training.
- The reported accuracy is an average over all folds.
Users requiring imbalanced datasets can use Build > Train in Tools to retrain a base model using the full dataset.
Step 3.7: Review and Select Candidate Model
Once the exploration completes (typically 5–20 minutes), several candidate models will be available. Some will be highlighted with a crown icon indicating the best performers.
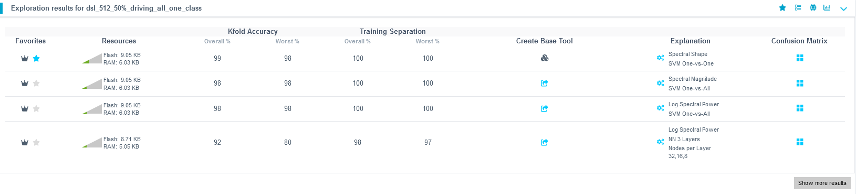
- Compare accuracy and resource usage.
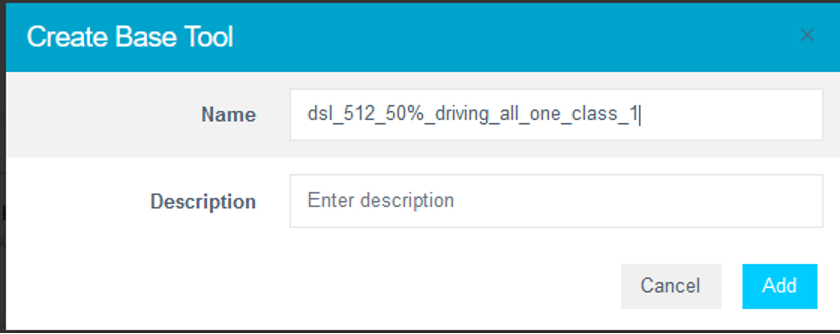
- Select a suitable model.
- Provide a name or use the suggested one.
- Click Add to finalize model selection.
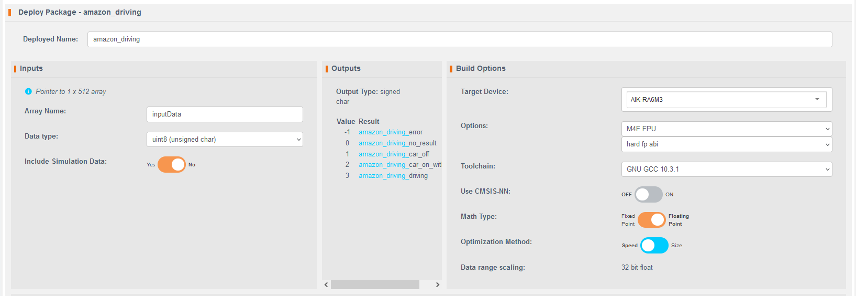
Step 3.8: Deploy the Model
- Click Deploy > Embedded.
- Open the Trained Tool Description dropdown.
- Click + New Package.
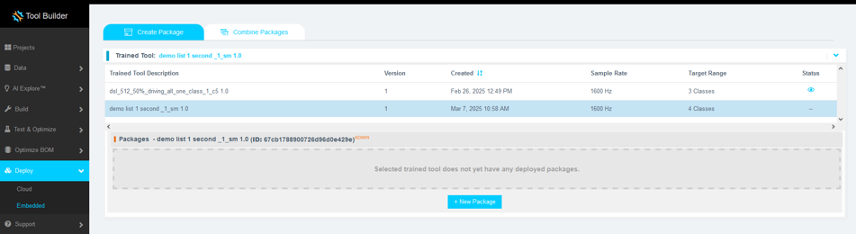
- Set the following options:
- Deploy Name: Use
"amazon_driving"to ensure compatibility with the Section 2 code. - Adjust other options as needed.
- Deploy Name: Use
- Click Generate New Package.
Model packaging may take 5–15 minutes.
Step 3.9: Download and Integrate the Model
- Once packaging completes, download the
.ziparchive using the Download button.
![]()
- The archive contains 7 files. Copy all files except:
example_classifier.creadme.txt
- Paste the remaining files into the
src\realityai\directory of your e² Studio project, overwriting the existing files.
Alternative Method
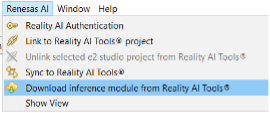
You can also download the deployed model from within e² Studio:
- In Project Explorer, right-click the project.
- Navigate to Renesas AI > Download inference module from Reality AI Tools.
- Select the deployed model and click Download.
Step 4: Deploy the Model
This section describes how to deploy and test the trained model on the Renesas AIK-RA6M3 hardware. You will configure the project, integrate the model into the source files, compile the application, and observe the LED indicators for model inference output.
Step 4.1: Continue from Previous Steps
Ensure you have completed all prior steps in the tutorial, including data collection and model generation using the Reality AI Tools portal, before proceeding.
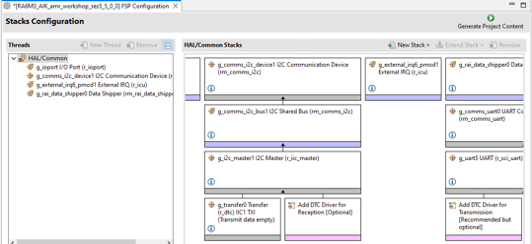
Step 4.2: Generate Project Content
- In the e² Studio project explorer, double-click the
configuration.xmlfile. - In the configuration editor, click Generate Project Content to apply the latest configurations to your project.
Step 4.3: Import Model Header in hal_entry.h
-
Open the
hal_entry.hfile. -
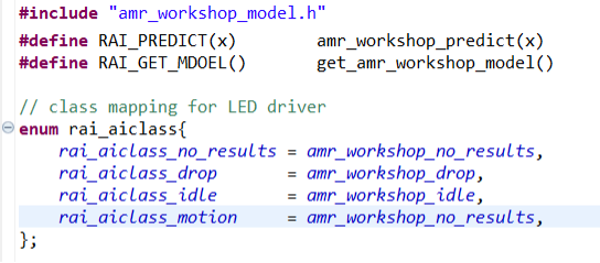
Import the model header file. If the deployed model is named
amr_workshop_model.h, no changes are needed apart from commenting out unused class references such ascircleandwave. -
If your model uses a different name, update the
#includedirective and modify the macros and enumeration values as follows:#include "amr_workshop_model.h"
#define RAI_PREDICT(x) amr_workshop_predict(x)
#define RAI_GET_MODEL() get_amr_workshop_model()
enum rai_aiclass {
rai_aiclass_no_results = amr_workshop_no_results,
rai_aiclass_drop = amr_workshop_drop,
rai_aiclass_idle = amr_workshop_idle,
rai_aiclass_motion = amr_workshop_motion
};
This configuration ensures correct model references during execution.
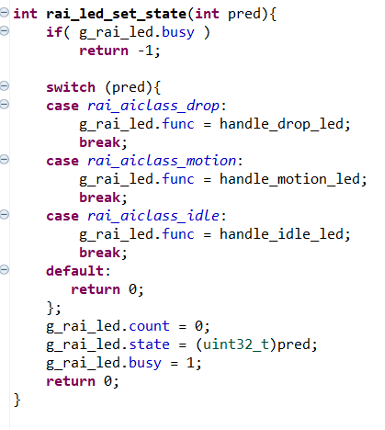
Step 4.4: Modify rai_led.c for This Tutorial
- Open the
rai_led.cfile. - Remove any classes not relevant to this specific Asset Movement Recognition (AMR) workshop.
- Ensure your LED control logic is updated as shown:
int rai_led_set_state(int pred) {
   if (g_rai_led.busy)
       return -1;

   switch (pred) {
   case rai_aiclass_drop:
       g_rai_led.func = handle_drop_led;
       break;
   case rai_aiclass_motion:
       g_rai_led.func = handle_motion_led;
       break;
   case rai_aiclass_idle:
       g_rai_led.func = handle_idle_led;
       break;
   default:
       return 0;
   };

   g_rai_led.count = 0;
   g_rai_led.state = (uint32_t)pred;
   g_rai_led.busy = 1;
   return 0;
   };
Step 4.5: Troubleshooting Model Performance Issues
If the model does not perform well during testing:
- Collect additional data under varied conditions and retrain the model.
- Ensure the data collection and testing procedures are aligned. Inconsistencies in setup can significantly affect model performance.
- More diverse and representative data generally improves model accuracy and robustness.
Step 4.6: Build the Project
Click the hammer icon in the toolbar of e² Studio to compile the project.
Step 4.7: Program and Run the Application
- Click the bug icon to start a debug session.
- Alternatively, right-click the project’s launch file and select Debug As > Renesas GDB Hardware Debugging for a more controlled start.
Step 4.8: Start the Application
- Press the Resume button or hit F8 on your keyboard to run the application.
- If paused, press Resume or F8 again to continue execution of the user code.
Step 4.9: Verify the Output on the AIK Kit
Move the board in different ways and observe the LED indicators to confirm model inference:
| Movement | LED Indicator |
|---|---|
| Drop | Red LED blinks |
| Idle | Green LED is ON |
| Motion | Light Blue LED is ON |
These indicators confirm successful classification by the deployed AI model.
Appendix
If the Reality AI items do not appear in the e² Studio title bar, complete the steps in this section to install and configure the required components.
Step A: Install Renesas IDE Features
- In e² Studio, go to Help > Install Renesas IDE Features...

- In the list of available features, select Reality AI and then click Finish.

- When prompted, restart e² Studio to apply the changes.
Step B: Configure Reality AI Monitor
- After restarting e² Studio, launch Reality AI Monitor from the main window.
- In the Settings tab:
- Select the project you created in the previous section.
- Under Inference Module, choose the corresponding project you created in Reality AI Tools.
- Navigate to the Data Connection section and connect to your hardware board.
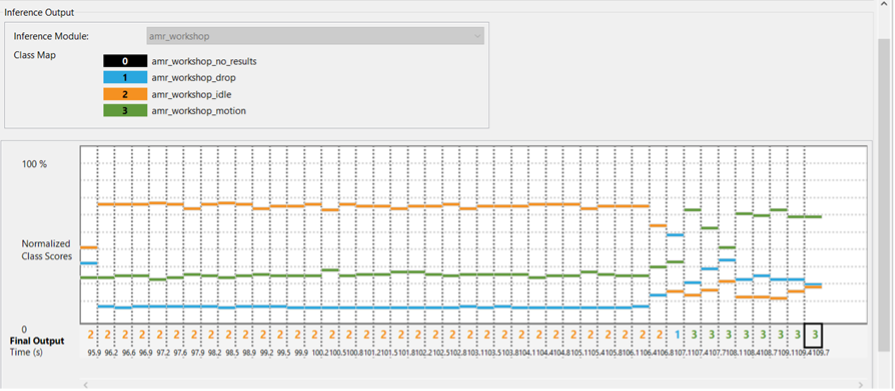
Reality AI Monitor enables real-time visualization of inference outputs generated during the workshop. This allows you to observe how the AI model responds to live sensor input.